Essential Nail Design Tools for Beginners
When it comes to creating beautiful nail designs, having the right tools is essential for beginners. These tools not only make the process easier but also help in achieving professional-looking results. Whether you’re just starting out or looking to expand your nail art collection, here are some must-have nail design tools that every beginner should have in their arsenal.
1. Nail Files and Buffers: One of the first things you’ll need is a good set of nail files and buffers. These tools are used to shape and smooth the nails, creating a perfect canvas for your designs. Look for files with different grits to cater to different nail types and a buffer to give your nails a shiny, polished finish.
2. Dotting Tools: Dotting tools are a must-have for creating intricate nail designs. These tools come in various sizes and are used to create dots, flowers, and other small details on the nails. They can be used with different nail polish colors to create beautiful patterns and designs.
3. Nail Striping Tape: Nail striping tape is a thin adhesive tape that is used to create straight and precise lines on the nails. It can be applied on dry nail polish to create unique designs or used as a guide for applying different colors. Nail striping tape is available in various widths and colors, allowing you to create endless design possibilities.
- 4. Nail Stamping Kit: Nail stamping is a popular technique that allows you to transfer intricate designs onto your nails. This kit includes stamping plates, a stamper, and a scraper. Simply select a design, apply nail polish to the plate, scrape off the excess polish, and stamp it onto your nails for an instant professional-looking design.
- 5. Nail Brushes: Nail brushes are essential for creating detailed nail designs. They come in various sizes and shapes, each serving a different purpose. From fine details to bold strokes, having a set of nail brushes can take your nail art to the next level.
- 6. Nail Rhinestones and Studs: Adding a touch of bling to your nail designs is easy with nail rhinestones and studs. These tiny embellishments can be applied to the nails using nail glue or a top coat, instantly transforming your manicure into a work of art.
| Tool | Function |
|---|---|
| Nail Files and Buffers | To shape and smooth the nails |
| Dotting Tools | To create intricate designs and patterns |
| Nail Striping Tape | To create straight and precise lines |
| Nail Stamping Kit | To transfer intricate designs onto the nails |
| Nail Brushes | To create detailed nail designs |
| Nail Rhinestones and Studs | To add embellishments and bling to the nails |
These are just a few of the essential nail design tools that every beginner should have. As you continue to explore the world of nail art, you’ll discover new tools and techniques that will inspire your creativity. Remember, practice makes perfect, so don’t be afraid to experiment and have fun with your nail designs!
Choosing the Right Nail Shapes for your Design
When it comes to nail design, choosing the right nail shape can make all the difference in achieving your desired look. The shape of your nails can enhance or detract from the overall design, so it’s important to consider which shape complements your individual style. Here are some essential nail shapes to consider for your next nail design:
1. Square nails: Square nails are a classic choice that offers a clean and modern look. This shape is perfect for those who prefer a minimalist and professional appearance. It’s also ideal for showcasing intricate nail art designs as the straight edges provide a great canvas.
2. Oval nails: Oval nails are a softer and more feminine alternative to square nails. This shape elongates the fingers and creates an elegant look. Oval nails are versatile and can work well with both bold and subtle nail designs.
3. Almond nails: Almond nails are characterized by their tapered shape and rounded edges. This shape is flattering on most hand shapes and adds a touch of sophistication to any nail design. Almond nails are especially popular for creating chic and glamorous looks.
| Nail Shape | Characteristics |
|---|---|
| Square nails | Clean and modern |
| Oval nails | Soft and feminine |
| Almond nails | Tapered and sophisticated |
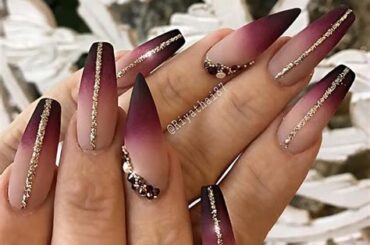
4. Stiletto nails: Stiletto nails are a bold and daring choice that exudes confidence and style. They are characterized by their sharp and pointed shape, resembling stiletto heels. Stiletto nails are perfect for showcasing intricate nail art and unique designs.
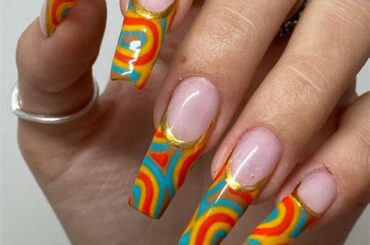
5. Coffin nails: Coffin nails, also known as ballerina nails, have become increasingly popular in recent years. This shape features long, tapered ends with a flat top, resembling a coffin or a ballerina slipper. Coffin nails are versatile and provide a sleek and edgy look.
It’s important to consider your lifestyle, personal style, and nail length when choosing the right nail shape. Remember, experimentation is key, and you can always switch up your nail shape to reflect your mood and current trends. Ultimately, the right nail shape will help you achieve the perfect canvas for your nail designs.
Simple and Chic Nail Design Ideas for Beginners
Nail art has become increasingly popular in recent years, with more and more people getting creative and experimenting with different designs. However, if you’re just starting out in the world of nail design, it can be overwhelming to know where to begin. That’s why we’ve put together this guide to simple and chic nail design ideas for beginners. Whether you’re looking for something subtle and elegant or bold and eye-catching, we’ve got you covered.
When it comes to nail design for beginners, it’s important to start with the right tools. There are a few essential nail design tools that every beginner should have in their kit. First and foremost, you’ll need a set of nail brushes. These come in different sizes and shapes, allowing you to create a variety of designs. Next, invest in a dotting tool, which is perfect for creating polka dots or intricate patterns. Finally, don’t forget about a good quality top coat to seal and protect your nail art.
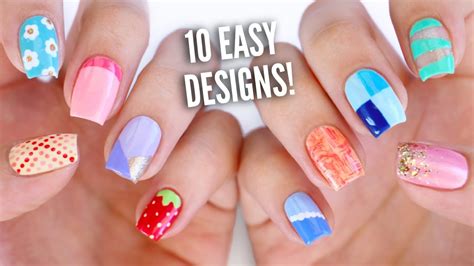
Now that you have your tools ready, let’s talk about some simple and chic nail design ideas. One popular design is the French manicure, which is timeless and classy. To achieve this look, start by applying a sheer nude polish as your base color. Then, using a white nail polish, carefully paint a thin line across the tips of your nails. You can leave it as it is or add a touch of sparkle with some glitter polish. This simple yet chic design is perfect for any occasion and goes with any outfit.
If you’re feeling more adventurous, why not try a geometric design? This modern and stylish look can be achieved using tape or nail guides. Start by applying a base color of your choice and allowing it to dry completely. Then, cut thin strips of tape or use nail guides to create different shapes on your nails. Once the tape is in place, paint over it with a contrasting color. Carefully remove the tape or nail guides, and you’ll be left with a stunning geometric design. Finish off with a glossy top coat for a polished finish.
List of Essential Nail Design Tools for Beginners:
- Nail brushes
- Dotting tool
- Top coat
List of Simple and Chic Nail Design Ideas for Beginners:
- French manicure
- Geometric design
In conclusion, nail design doesn’t have to be complicated or intimidating, especially for beginners. With the right tools and some simple yet chic ideas, you can create stunning nail art that will impress everyone. So, grab your brushes and get started on your nail design journey!
Step-by-Step Nail Art Tutorials for Beginners
Are you craving to have beautiful and intricate nail art designs but don’t know where to start? Well, fret not! In this blog post, we will guide you through step-by-step nail art tutorials specifically designed for beginners. With just a few essential tools and some creativity, you’ll be able to create stunning nail designs that will make heads turn. So, let’s dive right in and explore the world of nail art!
When it comes to nail art, having the right tools is crucial. To ensure smooth and flawless nail art, here are some essential nail design tools that every beginner should have:
- Nail Polish: Choose a range of vibrant colors and finishes to unleash your creativity.
- Nail Brushes: Invest in a set of different nail brushes with varying thickness for creating intricate designs.
- Dotting Tools: These handy tools are perfect for creating dots, flowers, and other detailed patterns.
- Nail Stamping Kit: Great for beginners, nail stamping kits allow you to transfer pre-designed patterns onto your nails effortlessly.
- Nail Striping Tape: Ideal for creating clean lines and geometric designs, nail striping tape is a must-have for any nail artist.
- Top Coat and Base Coat: Ensure your nail art lasts longer by applying a top coat for protection and a base coat for smooth application.
To get started with our step-by-step nail art tutorials, let’s begin with a simple and chic design that even beginners can master:
| Step | Instructions |
|---|---|
| 1 | Start by applying a base coat to protect your nails and give the polish something to adhere to. |
| 2 | Apply a light-colored nail polish as the base. Let it dry completely. |
| 3 | Using a thin nail brush, create small dots or lines in a contrasting color on your nails. |
| 4 | Allow the design to dry, then apply a top coat to seal in your nail art. |
Voila! You’ve just created a simple and chic nail design. As you gain more confidence and experience, you can experiment with different colors, patterns, and techniques. The key is to start with easy designs and gradually work your way up to more complex ones.
Remember, practice makes perfect. Don’t be discouraged if your first attempts don’t turn out exactly as you envisioned. Keep practicing, and soon you’ll be able to create stunning nail art designs like a pro.
Nail Polish Application Techniques for Flawless Results
When it comes to achieving flawless results with your nail polish application, it’s important to utilize the right techniques. Proper application not only enhances the overall look of your manicure but also ensures that it lasts longer without chipping or peeling. In this blog post, we will explore some essential techniques and tips to help you achieve salon-quality results right at home.
1. Preparing Your Nails
Before you even think about applying your nail polish, it’s crucial to properly prepare your nails. Start by removing any existing polish and then gently file your nails into your desired shape. Once you’ve achieved the desired shape, use a buffer to smooth out any ridges or imperfections on the nail surface. This creates a smooth canvas for your polish application.
2. Using a Base Coat
A base coat is a must-have when it comes to flawless nail polish application. Not only does it protect your natural nails from staining, but it also helps the nail polish adhere better and last longer. Apply a thin layer of base coat to each nail and let it dry completely before moving on to the next step.
3. Applying the Polish
When it’s time to apply your nail polish, make sure to use thin coats. Thick layers not only take longer to dry but also tend to be more prone to chipping. Start with a thin stroke down the middle of your nail and then apply strokes on each side to cover the entire nail. Allow each coat to dry before applying the next one, usually 2-3 coats are enough for an opaque and even finish.
4. Finishing with a Top Coat
To seal in your nail polish and add an extra layer of shine, finish off your manicure with a top coat. Not only does a top coat enhance the longevity of your polish but it also helps prevent chipping and adds a beautiful glossy finish. Apply a thin layer of top coat to each nail, making sure to seal the edges.
5. Cleaning up any Mistakes
If you happen to make any mistakes during the nail polish application, don’t worry! You can easily clean them up using a small brush dipped in nail polish remover. This allows for precise removal of any excess polish around the edges of your nails, resulting in a neat and professional-looking manicure.
In conclusion, flawless nail polish application is achievable with the right techniques and tools. By properly preparing your nails, using a base coat, applying thin coats of polish, finishing with a top coat, and cleaning up any mistakes, you can achieve salon-worthy results at home. So go ahead, experiment with different colors and designs, and enjoy beautiful and long-lasting manicures!
Creating Nail Designs with Basic Nail Art Techniques
When it comes to nail art, there are countless possibilities. From intricate designs to simple and minimalistic styles, it all depends on your creativity and the techniques you use. If you’re a beginner looking to experiment with nail art, starting with basic techniques is a great way to get started. In this blog post, we will explore some of the essential tools and techniques that will help you create stunning nail designs.
First and foremost, let’s talk about the essential nail design tools that every beginner should have. These tools will not only make your nail art process easier but also allow you to experiment with different designs and styles. Some of the must-have tools include nail clippers, a nail file, cuticle pusher, base coat, top coat, nail polish remover, and a variety of nail polish colors. Having these tools on hand will give you the freedom to explore different techniques and create unique nail designs.
Now that you have your tools ready, it’s time to choose the right nail shapes for your designs. The shape of your nails plays a crucial role in the overall look of your nail art. The most common nail shapes include square, round, oval, almond, stiletto, and coffin. Each shape has its own charm and complements different types of nail designs. For instance, square-shaped nails are perfect for geometric patterns, while oval-shaped nails are versatile and suit various designs. Experiment with different nail shapes to find the one that suits your style and preferences.
- Simple and Chic Nail Design Ideas for Beginners
- Step-by-Step Nail Art Tutorials for Beginners
- Nail Polish Application Techniques for Flawless Results
- Top Nail Design Tips to Extend the Lifespan of your Manicure
| Technique | Description |
|---|---|
| Dotting Tool | Using a dotting tool, you can create intricate patterns by making dots of different sizes. This technique is perfect for creating cute polka dot designs or adding details to your nail art. |
| Striping Tape | Striping tape is a thin adhesive tape that can be used to create straight lines and precise designs on your nails. Simply apply the tape in the desired pattern, paint over it, and remove the tape to reveal clean and crisp lines. |
| Stamping | Nail stamping involves transferring pre-designed images onto your nails using a stamping plate, stamper, and scraper. This technique allows you to create intricate designs with ease. |
These are just a few basic nail art techniques that you can experiment with as a beginner. The key is to practice and have fun while discovering your own unique style. Remember, nail art is all about expressing your creativity, so don’t be afraid to try new techniques and designs. With time and practice, you’ll be able to create stunning nail designs that will leave everyone in awe.
Top Nail Design Tips to Extend the Lifespan of your Manicure
Having a beautiful manicure is a lovely way to express yourself and enhance your overall appearance. However, keeping that manicure looking fresh and flawless can be a challenge. That’s why we’ve compiled a list of top nail design tips to help you extend the lifespan of your manicure and keep your nails looking fabulous for as long as possible.
1. Start with a clean canvas: Before applying any polish or nail design, make sure your nails are clean and free from any old polish or residue. Use a gentle nail polish remover to thoroughly clean your nails and ensure a smooth surface for your new manicure.
2. Use a base coat: Applying a base coat before your chosen nail polish can help protect your nails from staining and increase the lifespan of your manicure. Choose a base coat that suits your specific needs, whether it’s strengthening, nourishing, or simply providing a smooth surface for your polish to adhere to.
3. Seal the edges: The edges of your nails are particularly prone to chipping and peeling. To prevent this, gently swipe the tip and edges of each nail with the nail polish brush to seal the polish and create a protective barrier. This simple step can go a long way in extending the life of your manicure.
- 4. Avoid harsh chemicals: Chemicals found in cleaning products, harsh soaps, and certain beauty products can weaken your nails and cause your manicure to chip or peel. Whenever possible, wear gloves when cleaning or using harsh products, and opt for gentle, nail-friendly alternatives.
- 5. Apply thin coats: When applying nail polish or nail designs, it’s better to apply multiple thin coats rather than one thick coat. This allows each layer to dry properly and reduces the chances of smudging or chipping. Patience is key here, as it may take a bit longer, but the results are worth it.
- 6. Protect your nails: Whether you’re doing household chores or engaging in activities that may put your nails at risk, it’s important to protect them. Wear gloves when doing tasks that may involve contact with water, strong chemicals, or rough surfaces to prevent your manicure from getting damaged.
7. Moisturize regularly: Healthy nails are more likely to hold onto your manicure. Keep your nails and cuticles well moisturized by applying a nourishing cuticle oil or hand cream regularly. This helps prevent dryness, brittleness, and peeling, which can all shorten the lifespan of your manicure.
8. Avoid picking or biting: It’s tempting to pick at or bite off a chipped or peeling nail, but this can cause further damage and ruin your manicure. Instead, gently file down any rough edges or apply a quick patch of clear topcoat to temporarily fix the issue until you can give your nails some proper attention.
9. Reapply topcoat: Over time, your manicure may start to lose its shine and become less protected. To revive your manicure and extend its lifespan, apply a fresh layer of topcoat every few days. This will not only add shine but also provide an extra layer of protection against daily wear and tear.
10. Be gentle: Lastly, treat your nails with care. Avoid using them as tools to open cans, scrape off stickers, or perform other tasks that can put stress on them. By being gentle and mindful of your nails, you can help maintain your manicure and keep it looking fabulous for longer.
By following these top nail design tips, you can extend the lifespan of your manicure and enjoy beautifully polished nails for days on end. Remember to start with a clean canvas, invest in a good base coat, seal the edges, protect your nails, moisturize regularly, refrain from picking or biting, reapply topcoat, and be gentle. With a little extra care, your manicure can stay stunning for much longer.
Frequently Asked Questions
1. What are the essential nail design tools for beginners?
The essential nail design tools for beginners include nail clippers, a nail file, cuticle pusher, dotting tools, nail brushes, and a variety of nail polishes and top coats.
2. How do I choose the right nail shape for my design?
Choosing the right nail shape for your design depends on your personal style and preference. Some popular nail shapes include square, round, almond, and stiletto. Experiment with different shapes to find the one that suits your nails and desired design.
3. Can you suggest some simple and chic nail design ideas for beginners?
Some simple and chic nail design ideas for beginners include a French manicure, ombre nails, polka dots, geometric patterns, and glitter accent nails. These designs are easy to do and perfect for beginners.
4. Are there any step-by-step nail art tutorials available for beginners?
Yes, there are plenty of step-by-step nail art tutorials available for beginners on various websites and YouTube channels. These tutorials provide detailed instructions and visuals to help you create stunning nail art designs.
5. What are some nail polish application techniques for flawless results?
To achieve flawless nail polish application, it’s important to apply thin and even coats, wait for each coat to dry before applying the next, use a base coat to prevent staining, and seal the polish with a top coat for longevity and shine.
6. Can I create nail designs using basic nail art techniques?
Absolutely! Basic nail art techniques like polka dots, stripes, and floral patterns can create beautiful and intricate nail designs. With practice and creativity, you can create stunning nail art using simple techniques.
7. How can I extend the lifespan of my manicure?
To extend the lifespan of your manicure, you can apply a top coat every few days to refresh the shine and protect the polish, avoid exposing your nails to harsh chemicals and excessive water, wear gloves while doing household chores, and be gentle while using your nails to prevent chipping.


