Gather the necessary tools
Before starting any task, it’s important to ensure you have all the required tools. This holds true for removing nail tips as well. By having all the necessary tools handy, you can carry out the process smoothly and efficiently.
To properly gather the necessary tools, it’s recommended to create a checklist of items you will need. This will help you stay organized and prevent any last-minute scrambling. Here’s a list of essential tools you should have:
| Tools | Description |
|---|---|
| Acetone or nail tip remover solution | A high-quality nail tip remover solution or acetone is crucial for effectively removing the nail tips. Look for a product that is specifically designed for this purpose. |
| Aluminum foil | Aluminum foil is needed to wrap around your nails and hold the acetone-soaked cotton pads in place. Make sure to have enough sheets of foil for each finger. |
| Cotton pads or balls | You will require cotton pads or balls to soak in the nail tip remover solution. These will be placed on top of your nails and covered with aluminum foil. |
| Cuticle oil | After removing the nail tips, it’s important to replenish and nourish your nails. Cuticle oil helps in moisturizing and keeping your nails healthy. |
| Manicure stick or cuticle pusher | Having a manicure stick or cuticle pusher is beneficial for gently pushing back your cuticles. This step ensures a cleaner and neater nail appearance. |
| Nail buffer or file | To achieve a smooth and polished look after removing the nail tips, using a nail buffer or file is essential. They help in shaping and smoothening the nails. |
Once you have gathered all these tools, you are well-prepared to begin the process of removing your nail tips. Remember, having the right tools can make a significant difference in the overall outcome of your manicure. So, take a few minutes to gather everything you need before getting started!
Prepare your nails for removal
Preparing your nails for removal is an important step to ensure a smooth and safe process. By taking the time to gather the necessary tools and properly clean and care for your nails, you can make the removal process much easier and avoid damage to your natural nails.
Before you begin, gather the necessary tools for removing your nail tips. This may include a nail file, nail buffer, cuticle pusher, acetone or nail tip remover solution, cotton balls or pads, and aluminum foil. Having these tools on hand will make the removal process more efficient and convenient.
Once you have your tools ready, it’s time to prepare your nails for removal. Start by trimming your nails to a shorter length. This will make the removal process easier and prevent any snagging or discomfort. Next, use a nail file to gently file the surface of your nails. This will create a rough texture that will help the nail tip remover solution or acetone penetrate through the layers of the tips.
- Trim your nails to a shorter length
- File the surface of your nails
- Apply cuticle oil or moisturizer
After filing your nails, it’s important to moisturize and protect your cuticles. Apply a small amount of cuticle oil or moisturizer around the base of each nail and gently massage it in. This will hydrate and soften the cuticles, making them easier to push back and remove later on.
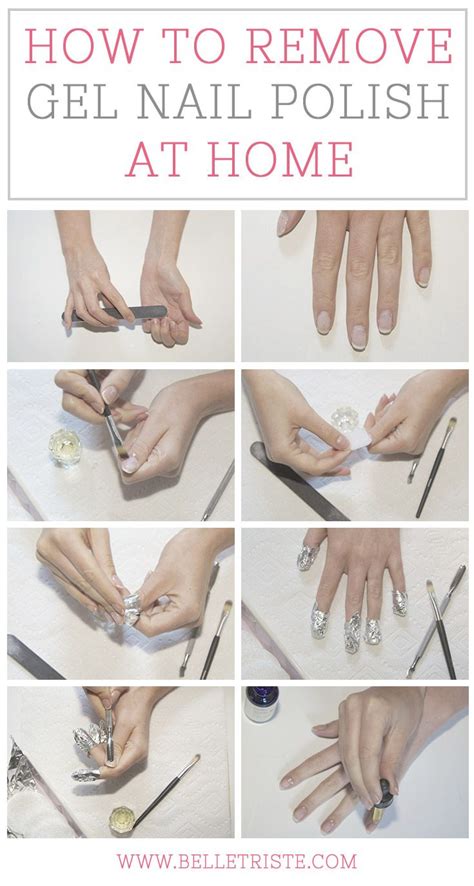
To further enhance the removal process, you can apply a generous amount of nail tip remover solution or acetone to a cotton ball or pad. Place it directly on top of each nail, making sure the entire nail tip is covered. Then, wrap each finger with a small piece of aluminum foil to secure the cotton and solution in place. The foil will help to create a barrier and prevent evaporation, allowing the solution to effectively break down the nail tips.
| Tools needed for nail removal | Instructions for nail preparation |
|---|---|
| Nail file | Trim your nails to a shorter length |
| Nail buffer | File the surface of your nails |
| Cuticle pusher | Apply cuticle oil or moisturizer |
| Acetone or nail tip remover solution | Apply nail tip remover solution or acetone |
| Cotton balls or pads | Wrap each finger with aluminum foil |
| Aluminum foil | Allow solution to break down the nail tips |
Once you have completed these steps, you are now ready to move on to the next phase of removing the nail tips. By properly preparing your nails, you can ensure a smoother and more successful removal process, while also minimizing the risk of any damage to your natural nails.
Apply nail tip remover solution
When it comes to removing your nail tips, one important step is applying a nail tip remover solution. This solution helps to soften and break down the adhesive that holds the nail tips in place, making it easier to remove them without causing any damage to your natural nails.
Before applying the nail tip remover solution, gather all the necessary tools you will need for the process. This includes a nail tip remover solution, cotton pads or balls, aluminum foil or nail clips, a nail file, and a cuticle stick. Having all these tools ready will ensure a smooth and effective removal process.
To prepare your nails for the application of the nail tip remover solution, start by filing down the surface of the nail tips. This removes any shine or topcoat and helps the solution penetrate better. Then, using a cuticle stick, gently push back the cuticles to expose more of the nail tip.
Now it’s time to apply the nail tip remover solution. Take a cotton pad or ball and saturate it with the solution. Place the saturated cotton pad directly on top of the nail tip and secure it in place by wrapping a small piece of aluminum foil around it. Alternatively, you can use nail clips to hold the cotton pad in place. Repeat this process for each nail tip.
Once all the cotton pads are in place, let the nail tip remover solution work its magic. It is recommended to leave the solution on for around 10-15 minutes to ensure proper softening of the adhesive. During this time, you can relax and catch up on your favorite TV show or indulge in some self-care activities.
After the recommended time has passed, carefully remove the aluminum foil or nail clips and cotton pads from each nail tip. Use a cuticle stick or your fingertips to gently push off the softened nail tips. Be gentle to avoid any damage to your natural nails.
Once all the nail tips are removed, it’s important to clean and care for your nails afterwards. Start by using a nail buffer or file to smooth out any rough edges or residue left behind. Then, wash your hands thoroughly with warm water and a gentle soap. Apply a nourishing cuticle oil or hand cream to moisturize and hydrate your nails and cuticles.
In conclusion, applying a nail tip remover solution is an essential step in the process of removing nail tips. By following the proper procedure and using the right tools, you can easily and safely remove your nail tips without causing any damage to your natural nails. Remember to always clean and care for your nails afterwards to maintain their health and beauty.
Remove the nail tips
Removing nail tips is a common task for those who enjoy wearing artificial nails. Whether you want to change your nail style or simply give your natural nails a break, knowing how to properly remove the nail tips is essential. In this blog post, we will guide you through the step-by-step process of removing nail tips without causing any damage to your natural nails.
Before starting the removal process, gather all the necessary tools. You will need a bowl of warm water, a nail file or buffer, cuticle oil or cream, a wooden stick, and a cloth or towel for drying your hands. Having these tools ready beforehand will make the process much smoother and more efficient.
To prepare your nails for the removal, start by filing down the top layers of the nail tips gently. This will help to break the seal and allow the removal solution to penetrate more effectively. Use gentle, back-and-forth motions, and avoid applying too much pressure. Once you’ve filed the nail tips, use a buffer to smooth out any rough edges and create a clean surface for the removal process.
Now it’s time to apply the nail tip remover solution. This solution is specifically designed to dissolve the adhesive used to attach the nail tips. Apply a small amount of the solution to each nail, focusing on the area where the nail tip meets your natural nail. Allow the solution to sit for the recommended amount of time, usually indicated on the product packaging. Be patient and avoid picking or pulling at the nail tips while waiting.
- Ensure you have all the necessary tools ready before starting the removal process
- Gently file down the top layers of the nail tips
- Smooth out any rough edges using a buffer
- Apply a nail tip remover solution to each nail
- Allow the solution to sit for the recommended amount of time
| Benefits of removing nail tips properly | Consequences of improper nail tip removal |
|---|---|
| Preserves the health of your natural nails | Damage to the natural nails |
| Prevents infections and nail fungus | Pain and discomfort |
| Allows for proper nail growth | Peeling or splitting of the natural nails |
After the recommended time has passed, gently push the loosened nail tips using a wooden stick. Start from the base of the nail and carefully work your way toward the tip. The nail tips should easily detach from your natural nails without any force or pain. If you encounter resistance, it means the adhesive hasn’t fully dissolved, and you should wait a bit longer before attempting to remove them.
Once you have successfully removed all the nail tips, it’s important to clean and care for your nails afterwards. Rinse your hands with clean water to remove any leftover solution and pat dry with a towel. Apply cuticle oil or cream to nourish and moisturize the nail bed, promoting healthy nail growth. Take this opportunity to give your natural nails a break from artificial enhancements and allow them to breathe.
Removing nail tips doesn’t have to be a daunting task. By following these steps and using the right tools, you can easily remove nail tips without causing any damage to your natural nails. Remember to take proper care of your nails afterwards to maintain their health and beauty.
Clean and care for your nails afterwards
After removing your nail tips, it is important to clean and care for your nails to ensure their health and maintain their appearance. Here are some essential steps to follow:
Step 1: Clean your nails – Use a gentle nail brush and warm soapy water to clean your nails and remove any residue or debris. Gently scrub your nails and cuticles, paying attention to the spaces around your nails. Rinse thoroughly and pat dry with a clean towel.
Step 2: Moisturize your nails – Apply a nourishing cuticle oil or hand cream to moisturize and hydrate your nails and cuticles. Massage the oil or cream into your nails and cuticles, focusing on the areas that are prone to dryness or peeling. This will help to keep your nails healthy and prevent them from becoming brittle.
Step 3: Protect your nails – To prevent your nails from becoming weak or damaged, avoid excessive exposure to harsh chemicals such as cleaning products or acetone-based nail polish removers. If you need to use these products, make sure to wear gloves to protect your nails.
Step 4: Maintain a healthy diet – Proper nutrition is essential for the health of your nails. Including foods rich in vitamins and minerals, such as fruits, vegetables, and proteins, can promote nail growth and strength. Additionally, drink plenty of water to keep your nails moisturized from the inside out.
Step 5: Avoid nail biting – Breaking the habit of nail biting is crucial for maintaining healthy nails. Nail biting can lead to nail damage and infection, so try to find alternative ways to manage stress or anxiety, such as using stress balls or practicing deep breathing exercises.
By following these simple steps, you can clean and care for your nails after removing the nail tips. Maintaining good nail hygiene and adopting healthy habits will not only keep your nails looking their best but also contribute to their overall health and strength.
Frequently Asked Questions
1. How do I gather the necessary tools for nail tip removal?
To gather the necessary tools for nail tip removal, you will need nail tip remover solution, cotton pads or balls, aluminum foil, a cuticle pusher or orangewood stick, and a nail file.
2. How should I prepare my nails for removal?
Before removing nail tips, it is important to trim your nails and file them down to remove any excess length. This will make the removal process easier and help to avoid any damage to your natural nails.
3. How do I apply nail tip remover solution?
To apply nail tip remover solution, saturate a cotton pad or ball with the solution and place it on top of each nail tip. Then, wrap each finger with aluminum foil to secure the cotton pad in place and allow the solution to soak into the nail tips.
4. How can I remove the nail tips?
After letting the nail tip remover solution soak for about 10-15 minutes, gently press down on the foil-wrapped nail tips and slide them off using a cuticle pusher or orangewood stick. Be careful not to force or pry the tips off, as this can cause damage to your natural nails.
5. How should I clean and care for my nails afterwards?
After removing the nail tips, use a nail file to gently buff away any residue or remaining adhesive. Then, wash your hands thoroughly and apply cuticle oil or nail conditioner to nourish and hydrate your nails. You can also apply a strengthening base coat to promote nail health.
6. How often should I remove and replace my nail tips?
The frequency of nail tip removal and replacement depends on individual nail health and preference. It is generally recommended to remove and replace nail tips every 2-3 weeks to allow your natural nails to breathe and grow.
7. Can I remove nail tips at home or should I go to a salon?
You can remove nail tips at home if you have the necessary tools and feel confident in doing so. However, if you are unsure or inexperienced, it may be best to visit a salon where professionals can safely remove the nail tips without causing damage to your natural nails.


