Are you tired of your nail polish chipping just a few days after application? Do you struggle with getting that perfect, professional-looking manicure at home? Look no further! In this step-by-step guide, we will walk you through the process of achieving flawless nail polish application every time. From prepping your nails to choosing the right polish shade, using a base coat, and applying the perfect top coat, we’ve got you covered. Say goodbye to smudges, streaks, and chips with our expert tips and tricks. Whether you’re a nail polish novice or a seasoned pro, this guide will help you master the art of the perfect manicure. So, grab your favorite polish shades and get ready to achieve salon-worthy results from the comfort of your own home. Let’s dive in and achieve those perfectly polished nails you’ve always dreamed of!
Prepping Your Nails
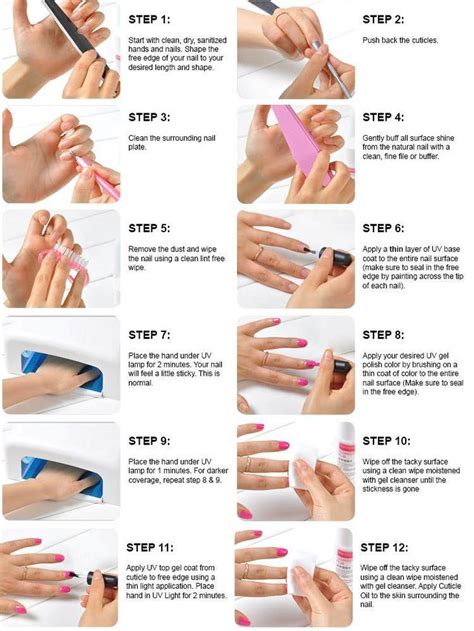
Before you start applying your favorite nail polish, it’s important to properly prep your nails to ensure a smooth and long-lasting finish. The first step in prepping your nails is to remove any existing polish using a gentle nail polish remover. Make sure to thoroughly clean the entire nail surface and remove any residue to create a clean canvas for your new polish.
Next, it’s essential to shape and file your nails to your desired shape. Whether you prefer a classic round shape or trendy almond shape, use a nail file to gently shape your nails and smooth out any rough edges. This will create a uniform base for your polish and prevent any catching or chipping.
After shaping your nails, it’s time to focus on your cuticles. Gently push back your cuticles using a cuticle pusher or orange stick. This will create a clean, even surface for your polish application and prevent any polish from adhering to the cuticle, leading to premature chipping or peeling.
Finally, wash your hands with soap and water to remove any excess oils or debris from your nails. This will ensure that your polish adheres properly to the nail surface and lasts as long as possible.
Choosing the Right Polish Shade
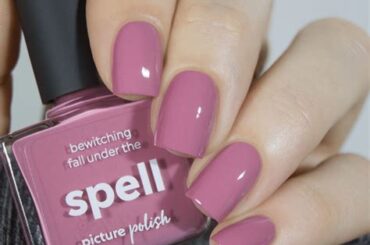
When it comes to choosing the right polish shade for your nails, there are a few key factors to consider. The first thing to keep in mind is your skin tone. If you have fair skin, lighter shades such as pastels and nudes tend to look the most flattering. For medium to olive skin tones, you can opt for a wider range of colors, from soft pinks to bold reds. And for darker skin tones, rich and vibrant shades like deep purples and blues will really pop.
Another important consideration is the occasion. If you’re going for a formal event, you may want to stick to classic and neutral tones. But for a fun night out or a casual day at the beach, you can experiment with bright and trendy colors. Don’t forget to also take into account your outfit. Your nail polish should complement and enhance your overall look, so think about what colors will work best with your clothes.
It’s also worth considering your nail shape and length. Different colors can create different visual effects, so you’ll want to pick a shade that flatters your nails. For example, darker hues can make short nails appear longer, while lighter shades can make long nails look more delicate. And finally, don’t be afraid to test out different colors and have fun with your nail polish. Nail trends come and go, so feel free to express yourself and try out new shades!
By keeping these factors in mind, you can ensure that you’re choosing the right polish shade to suit your personal style and enhance your overall look.
Using a Base Coat
Using a base coat is an essential step in achieving a perfect manicure. Not only does it help the polish adhere better to the nails, but it also creates a smooth surface for an even application. Before applying the color polish, make sure to start with a clear or neutral base coat. This will help protect your nails from staining and discoloration, especially if you’re using dark or vibrant colors.
Furthermore, a base coat acts as a barrier between your nails and the pigment in the polish, which can prevent yellowing and damage. It also helps to strengthen and nourish the nails, reducing the risk of breakage and promoting growth. With regular use, a good quality base coat can improve the overall health and appearance of your nails.
When applying the base coat, make sure to allow it to dry completely before moving on to the next step. This will ensure a smooth and long-lasting manicure. Take your time and apply the base coat evenly, covering the entire nail surface. Once it’s dry, you can proceed with applying your favorite nail polish color.
Overall, using a base coat is a simple yet crucial step in achieving a flawless manicure. Not only does it protect your nails, but it also contributes to the longevity and overall look of your nail polish. Don’t skip this step in your manicure routine, and you’ll notice the difference in your nail health and the durability of your polish.
Applying the First Coat
When applying the first coat of nail polish, it’s important to start with a clean, dry nail surface. Use a gentle nail polish remover to ensure there are no oils or residue left on the nails, as this will help the polish adhere better and last longer.
Next, apply a thin layer of base coat to help protect the nails and create a smooth surface for the polish to adhere to. Allow the base coat to dry completely before moving on to the next step.
Once the base coat is dry, carefully apply the first coat of your chosen polish shade. Be sure to use long, even strokes and avoid applying too much polish to prevent smudging and streaking. It’s better to start with a thin layer and build up if needed.
After applying the first coat, allow it to dry completely before moving on to the second coat. This will help prevent smudging and ensure a smooth, even finish.
Waiting for Drying Time
Waiting for drying time is essential to achieving a flawless manicure. It’s tempting to rush through this step, but taking the time to allow each coat of nail polish to dry completely is crucial for long-lasting results.
Applying a second coat before the first is fully dry can lead to smudges, streaks, and an uneven finish. Patience is key when it comes to waiting for nail polish to dry.
One way to ensure your nail polish dries in a timely manner is to use quick-dry products or a topcoat specifically designed to speed up the drying process. These products can help expedite the waiting game and give your nail polish a smooth, glossy finish.
Remember, taking the time to wait for drying time will ultimately result in a professional-looking manicure that lasts longer and looks flawless.
Applying the Second Coat
Applying the second coat of nail polish is an important step in achieving a smooth, flawless finish. After allowing the first coat to dry completely, it’s time to apply the second layer to amp up the color and coverage. Make sure to use long, smooth strokes to evenly distribute the polish across the nail surface.
It’s important to use a steady hand and take your time to avoid any streaks or bumps. The second coat is the finishing touch that brings the entire look together and gives it that professional salon-quality appearance.
Once the second coat is applied, allow it to dry completely before moving on to the next step. This will help prevent smudging and ensure that the polish sets in place for a long-lasting finish.
Remember, patience is key when it comes to applying the second coat of nail polish. Taking your time and being meticulous in your application will result in a stunning manicure that lasts for days.
Perfecting the Edges
Perfecting the Edges
When it comes to achieving the perfect manicure, perfecting the edges is a crucial step. After applying your base coat and the first and second color coats, you want to make sure that the edges of your nails look clean and neatly painted. This step can make a big difference in the overall look of your manicure.
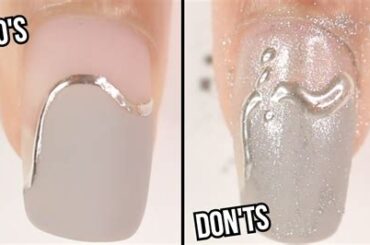
One way to ensure that the edges are perfect is to use a small brush dipped in nail polish remover to clean up any excess polish that may have spilled over onto your skin or cuticles. This will give your nails a polished and professional finish.
Another tip for achieving perfectly edged nails is to use a clear nail polish or top coat along the edges of your nails to seal in the color and prevent chipping. This extra layer of protection can help your manicure last longer and keep the edges looking clean and sharp.
Remember to take your time and be patient when perfecting the edges of your nails. It may require a steady hand and some practice, but the end result will be well worth the effort. By paying attention to the details, you can elevate your manicure and make it look like it was done by a professional.
Adding a Top Coat
Adding a top coat is the final step in achieving a professional-looking manicure. Once you have applied the second coat of your chosen nail polish shade and allowed it to dry completely, it’s time to seal in your hard work with a top coat. This clear layer not only adds shine to your nails but also helps to protect your polish from chipping and peeling.
When choosing a top coat, look for one that is labeled as quick-drying or fast-drying to minimize the time you’ll need to wait for it to set. Apply a thin, even layer of the top coat to each nail, making sure to cover the entire surface from edge to edge. Be careful not to apply too much pressure, as this can cause streaking or smudging of the freshly applied polish.
Once the top coat has been applied, allow your nails to dry completely before diving back into your daily activities. This will help to prevent any imprints or markings from appearing on the surface of your polish. If you’re in a hurry, you can speed up the drying process by running your nails under cold water or using a nail dryer.
By adding a top coat to your manicure routine, you can extend the life of your nail polish and keep your manicure looking fresh for days to come.
Clean Up Excess Polish
After applying your top coat, you may notice that you have some excess polish on the skin around your nails. Don’t worry, this is an easy fix. You can use a small, angled eyeliner brush dipped in acetone or polish remover to clean up the edges. Gently go around the edges of your nails to remove any stray polish and create a clean, professional-looking manicure.
It’s important to be careful not to remove any of the actual polish on your nails while cleaning up the excess. Take your time and use a light touch to ensure that you only remove the unwanted polish on the skin.
Once you have cleaned up the excess polish, you can finish off your manicure by applying a bit of cuticle oil to moisturize and nourish your nail beds.
By taking the time to clean up any excess polish, you can ensure that your manicure looks neat and professional, and will last longer without any chipping or peeling.
Tips for Long-Lasting Nail Polish
If you want your manicure to last longer, start with properly prepped nails. This means shaping your nails, pushing back your cuticles, and using a nail buffer to smooth the surface of your nails.
Choosing the right polish shade is also important for long-lasting nail polish. Darker shades tend to last longer without chips or cracks, so opt for deep reds or purples for a longer-lasting manicure.
Using a base coat is essential for protecting your nails and improving the durability of your manicure. Apply a thin layer of base coat before applying your polish to create a smooth surface and prevent staining.
Applying the second coat is crucial for long-lasting nail polish. Make sure to wait for the first coat to dry completely before applying the second coat to avoid smudges or bubbles.


