Prepping Your Nails
When it comes to creating beautiful nail art, proper nail preparation is crucial. Prepping your nails before applying any polish or design can help ensure a smoother and longer-lasting result. Whether you’re a seasoned nail artist or a beginner, taking the time to prepare your nails properly will make a world of difference in the final outcome. In this blog post, we will discuss the essential steps and techniques for prepping your nails to achieve salon-quality results.
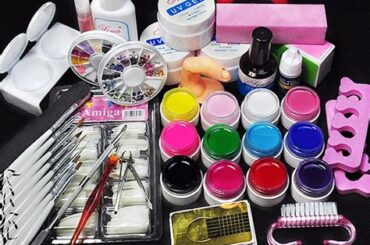
Before you begin prepping your nails, make sure you have all the necessary tools and products handy. Some of the basic tools you’ll need include a nail file, a cuticle pusher or trimmer, a nail buffer, and a quality nail cleanser or remover. Investing in these tools will make your nail prep process much easier and more efficient.
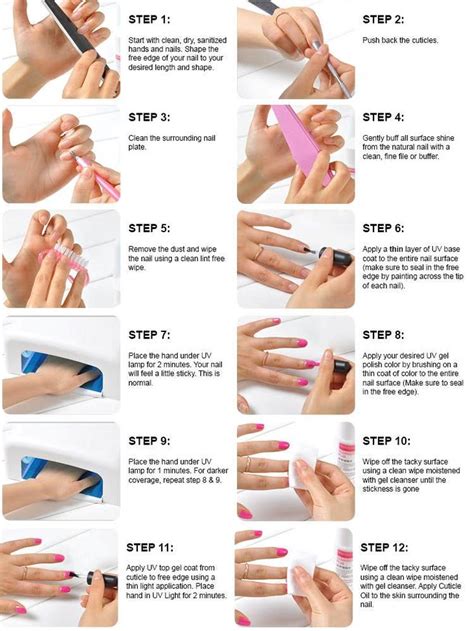
The first step in prepping your nails is to remove any existing polish or residue. Use a nail polish remover or gentle cleanser to thoroughly clean your nails. This will help ensure that the surface is clean and free from any oils or debris that could interfere with the adhesion of your nail polish or design.
- Next, it’s time to shape your nails. Use a nail file to shape your nails according to your preference. Whether you prefer a square, rounded, or almond shape, carefully file your nails in one direction to avoid damaging them. Pay attention to the length and symmetry of your nails to achieve a neat and uniform look.
- After shaping your nails, it’s important to take care of your cuticles. Gently push back your cuticles using a cuticle pusher or trimmer. Be careful not to cut or damage your cuticles, as they serve as a protective barrier for your nails. If necessary, you can also trim any excess cuticle using a cuticle trimmer.
- Once your cuticles are pushed back and trimmed, it’s time to gently buff the surface of your nails. A nail buffer can help smooth out any ridges or imperfections on the nail surface, creating a more even and polished canvas for your nail art. Remember to be gentle and avoid excessive buffing, as it can weaken the nails.
After you have finished prepping your nails, give them a final cleanse using a nail cleanser or remover to remove any dust or debris. Now, your nails are ready for the next step, whether it’s applying a base coat, experimenting with new nail art techniques, or adding intricate designs. Proper nail preparation not only improves the longevity of your nail art but also ensures a professional-looking finish.
| Benefits of Prepping Your Nails: |
|---|
| 1. Longer Lasting Nail Art: Prepping your nails creates a smooth and clean surface, allowing the nail polish or design to adhere better and last longer without chipping or peeling. |
| 2. Professional Results: By taking the time to properly prep your nails, you can achieve salon-quality results at home. Well-prepped nails provide a polished and professional appearance. |
| 3. Improved Nail Health: Proper nail preparation helps in maintaining the health of your natural nails. Regularly removing old polish, shaping your nails, and pushing back cuticles can help prevent nail infections and keep your nails looking their best. |
Remember, prepping your nails is an essential step in creating beautiful nail art. Taking care of your nails not only enhances the overall appearance but also ensures the longevity and durability of your designs. So, the next time you embark on a nail art journey, don’t forget to give your nails the attention they deserve!
Choosing the Right Tools
Choosing the Right Tools for your nail art journey is crucial to achieving professional-looking results. Having the right tools not only helps in creating intricate designs but also ensures that your nails are prepped and protected properly. Whether you are a beginner or a seasoned nail artist, investing in high-quality tools can make a significant difference in the overall outcome of your nail art.
One of the must-have tools for nail art is a good quality nail file. Nail files come in various shapes, sizes, and grits. When selecting a nail file, consider the strength and texture of your natural nails. If you have weak or brittle nails, opt for a finer grit file to prevent excessive damage. On the other hand, if you have strong nails, a coarser grit file can help shape them more effectively. Additionally, choose a file with a shape that suits your preference, whether it be oval, square, or coffin-shaped.
Another essential tool for nail art is a set of nail brushes. Different brushes serve different purposes in nail art, from creating fine lines to filling in larger areas. A thin brush with synthetic bristles is ideal for detailed designs, while a wider brush can be used for applying base colors or creating gradients. It’s important to clean your brushes thoroughly after each use to maintain their quality and prevent color contamination.
Dotting tools are also indispensable for creating nail art. These tools are perfect for making dots of various sizes on your nails, which can be combined to form patterns or designs. Dotting tools usually come in a set with different-sized tips for versatility. You can use them to create polka dots, flowers, or even intricate mandala patterns. Experimenting with different sizes and combinations can add depth and dimension to your nail art.
- Nail file
- Nail brushes
- Dotting tools
| Tool | Function |
|---|---|
| Nail file | Shaping and smoothing nails |
| Nail brushes | Creating detailed designs and filling in colors |
| Dotting tools | Producing dots of various sizes for patterns and designs |
In conclusion, having the right tools is essential for achieving stunning nail art. When choosing the right tools, consider the condition of your natural nails and the specific designs you want to create. Investing in high-quality nail files, brushes, and dotting tools can significantly enhance the outcome of your nail art. So, go ahead and get yourself the tools you need to unleash your creativity and achieve professional-looking nails!
Exploring Nail Art Techniques
The world of nail art has exploded in recent years, with countless creative designs and techniques to choose from. Whether you’re a beginner or a seasoned nail artist, there are always new and exciting techniques to explore. From minimalist designs to intricate masterpieces, nail art offers endless possibilities to express your personal style. In this blog post, we’ll dive deep into the world of nail art techniques and explore some popular methods that you can try out for yourself.
One of the most popular nail art techniques is stamping. Stamping allows you to create intricate designs on your nails using pre-designed plates and a stamping tool. This technique is perfect for those who want to achieve professional-looking nail art without spending hours on intricate hand-painted designs. With a wide variety of stamping plates available in the market, you can easily find designs that suit your preferences and skill level. Simply apply a stamping polish to the plate, scrape off the excess, pick up the design with the stamping tool, and transfer it onto your nails. It’s a fun and simple way to create stunning nail art!
If you’re looking for a more freehand approach to nail art, water marbling is a technique worth exploring. This mesmerizing technique involves creating unique patterns by dropping nail polish onto water and swirling it around to create a marble-like effect. Once you’ve achieved your desired pattern, simply dip your nails into the water and let the polish adhere to them. It may take some practice to master water marbling, but the results are well worth it. Each nail will have a one-of-a-kind pattern, making it a truly unique and eye-catching nail art technique.
- Dotting tools are another essential tool for nail art enthusiasts. These small, double-ended tools come in various sizes and can be used to create intricate designs such as polka dots, flowers, or even intricate mandalas. Simply dip the tip of the tool into your desired nail polish color and dot it onto your nails in a pattern of your choice. Dotting tools are versatile and can be used in combination with other techniques, such as stamping or water marbling, to create unique and complex designs.
- Tape manicures are perfect for achieving clean and crisp lines in your nail art. By using different shapes and sizes of tape, you can create geometric designs, stripes, or even negative space nail art. Simply apply the tape onto your nails, leaving the desired areas exposed, and then apply your chosen nail polish. Once the polish is dry, carefully remove the tape to reveal your perfectly defined lines. Tape manicures are a great way to experiment with different shapes and patterns without the need for a steady hand.
In conclusion, exploring nail art techniques opens up a whole new world of creativity and self-expression. Whether you choose to try stamping, water marbling, or any other technique, don’t be afraid to experiment and have fun with your nail art. Remember to seal and protect your nail art with a top coat to ensure its longevity. So go ahead, grab your nail art tools, and let your creativity run wild!
Adding Intricate Designs
When it comes to nail art, adding intricate designs can take your nails to the next level. Whether you are a beginner or an experienced nail artist, incorporating intricate designs can enhance the overall look of your manicure. There are various techniques and tools that you can use to create stunning designs that will wow everyone around you. In this blog post, we will explore some tips and tricks to help you master the art of adding intricate designs to your nails.
Listed below are some key points to keep in mind when adding intricate designs to your nails:
- Practice makes perfect: Like any skill, nail art requires practice. Start by practicing basic designs such as dots, stripes, and lines before moving on to more complex patterns.
- Use the right tools: Having the right tools is essential for creating intricate designs. Invest in a good set of nail brushes, dotting tools, and striping brushes to achieve precise lines and details.
- Get inspired: Look for inspiration from various sources such as social media, magazines, or even nature. Observe different patterns and colors that catch your eye and try to recreate them on your nails.
- Experiment with different techniques: Don’t be afraid to try out different techniques such as water marbling, stamping, or freehand painting. Each technique offers unique opportunities to create intricate designs.
- Pay attention to detail: The key to adding intricate designs is in the details. Take your time and be patient when working on your nails. Pay attention to small details and make use of different colors and textures to add depth to your designs.
Now that you have some essential tips and tricks, let’s talk about creating a beautiful and intricate nail design using a table.
| Design | Technique | Tools |
|---|---|---|
| Floral | Freehand painting | Thin brush, multiple nail polish colors |
| Geometric | Striping tape | Striping brush, striping tape, multiple nail polish colors |
| Lace | Stamping | Stamping plate, stamper, multiple nail polish colors |
| Abstract | Splatter technique | Straw, multiple nail polish colors |
These are just a few examples of intricate designs that you can create on your nails. Remember to have fun and let your creativity shine through. With practice and experimentation, you will soon be able to add stunning intricate designs to your nail art repertoire.
Sealing and Protecting Your Nail Art
When it comes to nail art, sealing and protecting your designs is essential to ensure that they last longer and stay intact. By sealing your nail art, you can prevent chipping, smudging, and fading, and maintain the beauty of your nails for an extended period of time. In this blog post, we will explore different techniques and products that will help you seal and protect your nail art effectively.
Use a Top Coat: One of the easiest and most common ways to seal your nail art is by using a top coat. A top coat acts as a protective layer on top of your nail art, preventing it from getting damaged. Look for a top coat that is specifically designed for nail art as it will provide additional benefits such as quick drying, high gloss, and chip resistance. Apply a thin layer of top coat over your completed nail art and let it dry completely before proceeding with any further steps. This simple step can significantly increase the longevity of your nail art.
Apply a Nail Glue: For more intricate designs or 3D nail art elements, using a nail glue can provide extra durability and protection. Nail glue works by adhering the design tightly to the nail surface, ensuring that it doesn’t come off easily. Before applying the nail glue, make sure your nail art is completely dry. Apply a small amount of glue onto the specific area where you want to attach the design, and carefully press it down. Allow the glue to dry completely before proceeding with any other steps to prevent smudging or ruining the design.
Protect with a Nail Wraps: Another way to seal and protect your nail art is by using nail wraps. Nail wraps are thin adhesive materials that can be applied over your nail art. They not only provide an extra layer of protection but also add a glossy finish to your nails. Nail wraps are available in various colors, prints, and patterns, allowing you to choose the ones that complement your nail art. Simply apply the nail wraps over your nails, cut them to the desired length, and smooth out any wrinkles or air bubbles. Trim the excess wrap and finish off with a top coat for added durability.
By following these sealing and protecting techniques, you can ensure that your nail art stays flawless, vibrant, and protected for an extended period. Don’t underestimate the power of a good top coat, nail glue, or nail wraps in increasing the longevity of your beautiful nail art. So, the next time you spend time creating intricate designs or vibrant nail art, remember to seal and protect it to make it last!
Frequently Asked Questions
Q: Why is prepping your nails important?
A: Prepping your nails is crucial because it helps to create a smooth and even surface for nail polish application, ensuring longer-lasting results.
Q: What are some essential tools for nail preparation?
A: Some important tools for nail preparation include a nail file, buffer, cuticle pusher, and nail polish remover.
Q: What are some popular nail art techniques?
A: Popular nail art techniques include stamping, water marbling, gradient, and freehand painting.
Q: How can I create intricate nail art designs?
A: To create intricate nail art designs, you can use nail art brushes, dotting tools, and nail decals. Practice and patience are also key in achieving intricate designs.
Q: How can I seal and protect my nail art?
A: You can seal and protect your nail art by applying a top coat or clear nail polish. This will not only make your design last longer but also add shine to your nails.
Q: How often should I change my nail art?
A: The answer depends on personal preference and the condition of your nails. Some people change their nail art weekly, while others may keep it for several weeks.
Q: How can I remove nail art without damaging my nails?
A: To remove nail art without damaging your nails, soak a cotton pad in nail polish remover and place it on your nail for a few minutes. Then gently wipe off the polish, using a manicure stick if needed.


