Choosing the right nail polish remover
Choosing the right nail polish remover is essential for maintaining healthy and beautiful nails. With so many options available in the market, it can be overwhelming to find the perfect one for your needs. Whether you prefer acetone-based removers or non-acetone alternatives, understanding the different types of nail polish removers will help you make an informed decision.
Acetone-based nail polish removers are the most common and effective type. They contain a powerful solvent called acetone, which easily dissolves all types of nail polish. Acetone removers work quickly and efficiently, making them ideal for removing stubborn and dark-colored nail polishes. However, they can be harsh on the nails and cuticles, causing dryness and irritation. If you have sensitive or dry nails, you may want to consider non-acetone alternatives.
Non-acetone nail polish removers are gentler on the nails and cuticles. They are typically made with ingredients like ethyl acetate, isopropyl alcohol, or propylene carbonate. These removers are less harsh and less drying compared to acetone-based ones. Non-acetone removers are a great option for individuals with weak or damaged nails, as they help maintain the natural moisture balance of the nails. However, they may require a bit more effort and time to effectively remove certain types of nail polish.
- Consider your nail type and condition: If you have strong and healthy nails, you can opt for acetone-based removers. On the other hand, if your nails are weak or prone to damage, non-acetone alternatives may be more suitable.
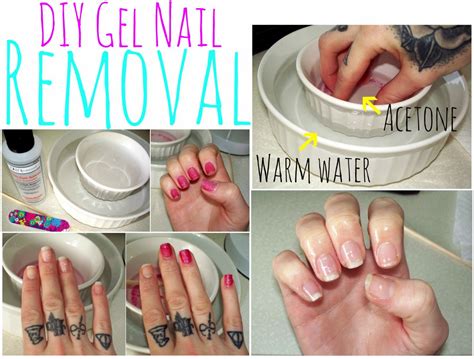
- Take note of the nail polish you often use: Some nail polishes, especially those with glitter or gel formulas, can be more difficult to remove. In such cases, an acetone-based remover may be your best bet.
- Check for additional beneficial ingredients: Some nail polish removers also contain nourishing ingredients like vitamin E or aloe vera, which can help prevent drying and strengthen the nails.
- Consider the scent: Nail polish removers can have a strong odor, especially those with acetone. If strong scents bother you, look for removers with a milder fragrance or consider using them in a well-ventilated area.
| Type | Pros | Cons |
|---|---|---|
| Acetone-based | Quick and effective removal | Can be harsh and drying |
| Non-acetone | Gentle on nails and cuticles | May require more effort and time |
Ultimately, choosing the right nail polish remover depends on your personal preferences, nail health, and the type of nail polish you use. Experimenting with different brands and formulas will help you discover the remover that works best for you. Remember to always follow the instructions provided on the packaging to ensure safe and effective use. With the right nail polish remover in hand, you can effortlessly remove your old polish and prepare your nails for a fresh coat of color!
Understanding the different types of nail polish removers
When it comes to nail care and maintenance, one of the key steps is removing your old nail polish before applying a new one. But have you ever paused to think about the different types of nail polish removers available in the market? Understanding the different types of nail polish removers can help you choose the right one for your needs and ensure that your nails remain healthy and strong.
1. Acetone-based Nail Polish Removers:
Acetone is a common ingredient found in most nail polish removers. It is a powerful solvent that quickly dissolves nail polish. Acetone-based removers are generally highly effective and work fast in removing even the most stubborn nail polishes, including glitter nail polishes. However, acetone can be harsh and drying on the nails and cuticles, so it is important to moisturize your nails after using acetone-based removers.
2. Non-Acetone Nail Polish Removers:
If you have sensitive nails or are concerned about the drying effects of acetone, non-acetone nail polish removers are a great alternative. These removers are usually made with gentler solvents like ethyl acetate or methyl ethyl ketone. They may take a bit longer to remove the nail polish compared to acetone-based removers, but they are less harsh and drying on the nails. Non-acetone removers are also a better option for those with artificial nails, as acetone can weaken and damage certain types of nail extensions.
3. Natural and DIY Nail Polish Removers:
For those who prefer a more natural approach to nail care, there are several DIY options available. Some natural nail polish removers use ingredients like vinegar, lemon juice, or rubbing alcohol to remove nail polish. While these natural alternatives may not be as powerful as acetone or non-acetone removers, they can still be effective in removing regular nail polishes. However, it is important to note that natural removers may not work well on stubborn or glitter nail polishes.
List of Different Types of Nail Polish Removers:
- Acetone-based Nail Polish Removers
- Non-Acetone Nail Polish Removers
- Natural and DIY Nail Polish Removers
Comparison of Different Types of Nail Polish Removers:
| Type of Remover | Pros | Cons |
|---|---|---|
| Acetone-based | Quickly removes nail polish, effective for stubborn and glitter polishes | Can be harsh and drying on nails and cuticles |
| Non-Acetone | Gentler on nails, suitable for sensitive nails, safe for certain types of nail extensions | Takes longer to remove polish compared to acetone-based removers |
| Natural and DIY | More natural and chemical-free alternative, can be effective for regular polishes | May not work well on stubborn or glitter polishes |
Now that you have a better understanding of the different types of nail polish removers, you can make an informed decision on which type best suits your needs. Whether you prefer the quick and powerful action of acetone-based removers, the gentleness of non-acetone removers, or the natural approach of DIY removers, there is a nail polish remover out there that will help you achieve clean and healthy nails.
Prepping your nails before using a nail polish remover
Before you reach for your trusty nail polish remover, it’s important to properly prepare your nails. Taking a few extra steps can help protect your nails and ensure a clean and even polish removal. By following these tips for prepping your nails, you’ll be on your way to achieving salon-worthy results in the comfort of your own home.
List of essential steps for prepping your nails:
- Trim your nails:
- Gently file your nails:
- Remove any existing nail polish:
- Clean and dry your nails:
- Apply a cuticle oil or cream:
- Push back your cuticles:
Table comparing different nail prep products:
| Product | Benefits | Usage |
|---|---|---|
| Nail polish remover with acetone | Effective in removing stubborn nail polish | Soak a cotton pad and gently rub over the nails |
| Nail polish remover without acetone | Gentler on nails | Soak a cotton pad and gently rub over the nails |
| Prep and prime solution | Helps to remove oils and residue from nails | Apply a small amount on a cotton pad and wipe nails |
| Nail scrub brush | Thoroughly cleans nails and cuticles | Use with soap and warm water to scrub nails |
Prepping your nails before using a nail polish remover not only ensures a smoother and neater polish removal process, but also helps to protect the health of your nails. So, the next time you’re ready to change up your nail color, don’t forget to give your nails some extra love and care beforehand.
Step-by-step guide to using nail polish remover effectively
Using nail polish remover effectively is essential for achieving clean and flawless nails. Whether you’re a novice or an experienced nail enthusiast, following a step-by-step guide can help you get the best results. So, let’s dive into the process and learn how to use nail polish remover effectively in just a few simple steps.
Step 1: Gather Your Supplies
Before you start, gather all the necessary supplies. You will need:
- A bottle of nail polish remover
- Cotton pads or balls
- An orange stick or cuticle pusher
- A nail file or buffer (optional)
- Hand moisturizer or cuticle oil (optional)
Having everything ready in advance will make the process smoother and more efficient.
Step 2: Protect Your Skin
Before applying nail polish remover, it’s essential to protect the skin around your nails. Take a small amount of petroleum jelly or moisturizer and apply it to the skin around your nails. This acts as a barrier, preventing the nail polish remover from drying out your skin and causing irritation.
Step 3: Soak the Cotton Pad
Moisten a cotton pad or ball with nail polish remover. Make sure the pad is wet but not dripping. Too much liquid can cause the nail polish remover to seep into your skin, making it dry and irritated.
Step 4: Place the Cotton Pad on Your Nail
Place the moistened cotton pad on your nail and press it down gently. Allow it to sit on the nail for a few seconds, allowing the nail polish remover to dissolve the polish.
Step 5: Wipe and Repeat
After a few seconds, gently wipe the cotton pad from the base of your nail towards the tip. Avoid rubbing or scrubbing, as this can damage your nails. If there is any remaining polish, repeat the process until your nails are clean.
Step 6: Clean up the Edges
To clean up any polish on the edges of your nails, take an orange stick or cuticle pusher and wrap a small piece of cotton around the tip. Moisten it with nail polish remover and carefully remove any excess polish.
Step 7: Moisturize Your Nails and Cuticles
After removing the nail polish, it’s important to replenish moisture. Apply a nourishing hand moisturizer or cuticle oil to hydrate your nails and cuticles. This step helps prevent dryness and keeps your nails looking healthy.
Congratulations! You’ve successfully completed the step-by-step guide to using nail polish remover effectively. Remember to take your time and be gentle with your nails throughout the process. By following these steps, you’ll achieve clean and well-prepped nails that are ready for your next manicure.
Tips for removing stubborn and glitter nail polishes
When it comes to removing stubborn and glitter nail polishes, it can often be a frustrating and time-consuming task. However, with the right tips and techniques, you can make the process easier and more efficient. In this blog post, we will explore some helpful tips for effectively removing stubborn and glitter nail polishes, so you can achieve clean and beautiful nails without any hassle.
1. Choose the right nail polish remover: Not all nail polish removers are created equal, especially when it comes to removing stubborn and glitter polishes. Look for a remover that is specifically designed to tackle these types of polishes. Acetone-based removers are generally more effective, but they can be harsh on the nails, so consider using a acetone-free remover if you have sensitive nails.
2. Prep your nails: Before using a nail polish remover, it’s important to prep your nails properly. Start by gently filing the surface of your nails to remove any excess polish or nail art. This will help the remover to penetrate and dissolve the polish more efficiently.
3. Soak a cotton pad: Take a cotton pad and soak it with the nail polish remover. Make sure the pad is fully saturated but not dripping. Fold the cotton pad in half to create a small pocket, which will help to concentrate the remover on each nail.
4. Place the cotton pad on your nail: Take the soaked cotton pad and place it on your nail, pressing down gently. Leave it on for a few seconds to allow the remover to work its magic. Then, using a gentle circular motion, start wiping away the polish from your nail.
5. Repeat if necessary: Depending on the stubbornness of the polish, you may need to repeat the process on each nail to completely remove all traces of glitter or stubborn polish. Take your time and be patient, as rushing can lead to residue or staining.
6. Moisturize and protect: After removing the polish, it’s important to moisturize and protect your nails. Apply a nourishing cuticle oil or a moisturizing nail cream to replenish hydration and prevent drying or damage.
| Tip | Solution |
|---|---|
| Use a glitter base coat: | Before applying glitter polish, use a clear or white glitter base coat. This will provide a smooth surface and make it easier to remove the glitter polish later on. |
| Try the foil method: | If you’re really struggling to remove glitter polish, you can try the foil method. Soak small pieces of cotton pad in nail polish remover, place them on each nail, and wrap aluminum foil around your fingertips. Leave it on for about 10 minutes, then remove the foil and gently wipe away the polish. |
| Avoid picking or peeling: | Resist the urge to pick or peel off the polish, as this can damage your nails and leave them weak and brittle. Always use a proper remover to ensure safe and effective removal. |
By following these tips and techniques, you can say goodbye to the struggle of removing stubborn and glitter nail polishes. With the right nail polish remover and proper technique, you can achieve clean and beautiful nails in no time!
Avoiding common mistakes when using nail polish remover
When it comes to removing nail polish, we all want it to be a quick and effortless process. However, there are some common mistakes that many of us make when using nail polish remover, which can lead to unwanted outcomes such as dry and damaged nails. By being aware of these mistakes and avoiding them, you can ensure that your nail polish removal experience is effective and gentle on your nails.
1. Using too much nail polish remover: One common mistake is using excessive amounts of nail polish remover. This not only wastes the product but can also lead to the remover coming into contact with your skin, drying it out. To avoid this, use a moderate amount of remover on a cotton pad and gently press it onto your nail, allowing it to soak for a few seconds before wiping away the polish.
2. Scrubbing too hard: Another mistake is using excessive force when removing nail polish. Scrubbing vigorously can damage the surface of your nails and weaken them over time. Instead, hold the cotton pad on your nail for a few seconds and then gently swipe it away in one motion. If there are any remnants of polish left, you can use a clean cotton pad to remove them.
3. Neglecting to moisturize: After removing nail polish, it’s important to moisturize your nails and cuticles to prevent them from drying out. Nail polish remover contains drying ingredients that can strip the natural oils from your nails, so it’s essential to replenish them. Apply a nourishing cuticle oil or hand cream after removing polish to keep your nails and cuticles hydrated and healthy.
By avoiding these common mistakes, you can ensure that your nail polish removal process is both effective and gentle on your nails. Remember to use a moderate amount of nail polish remover, avoid scrubbing too hard, and moisturize your nails afterward. Taking these steps will help keep your nails in top condition and maintain their natural strength and beauty.
Alternative methods for nail polish removal
When it comes to removing nail polish, there are a variety of methods to choose from. While traditional nail polish removers are widely available and effective, there are also alternative methods that you can consider. These alternative methods may be especially appealing if you have sensitive skin or are looking for a more natural approach to nail care. In this blog post, we will explore some of these alternative methods for nail polish removal.
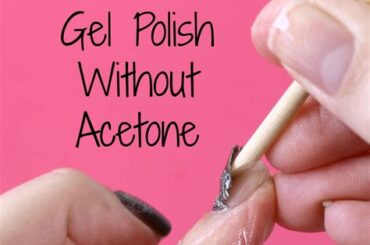
1. Acetone-free Nail Polish Remover: One alternative method is to use an acetone-free nail polish remover. Acetone is a common ingredient in traditional nail polish removers, but it can be drying and harsh on the nails and cuticles. Acetone-free removers are typically gentler and less drying, making them a great option for those with sensitive or dry nails.
2. DIY Vinegar Solution: Another alternative method is to create your own nail polish remover using household ingredients. One popular DIY solution is a vinegar and lemon juice mixture. Simply combine equal parts vinegar and lemon juice, soak a cotton ball in the mixture, and use it to remove your nail polish. This method can be effective and less harsh on the nails compared to traditional removers.
3. Peel-off Base Coat: If you’re looking for a hassle-free method of nail polish removal, a peel-off base coat may be the answer. Peel-off base coats act as a barrier between your nails and the nail polish, allowing you to easily remove the polish by peeling it off in one piece. This method can be especially convenient for those who frequently change their nail color or enjoy experimenting with different designs.
While alternative methods for nail polish removal can be effective, it’s important to keep in mind that results may vary depending on the type and brand of polish you’re using. It’s also important to properly prep your nails before using any method to ensure optimal results. Remember to always follow the instructions provided by the manufacturer and to take proper care of your nails and cuticles to maintain their health and strength.
| Pros | Cons |
|---|---|
| – Gentler on the nails | – May require more effort |
| – Suitable for sensitive skin | – Results may vary |
| – More natural option | – Some methods may take longer |
Ultimately, the choice of nail polish removal method is a personal one. Whether you prefer traditional removers, alternative methods, or a combination of both, the most important thing is to find a method that works for you and keeps your nails healthy and beautiful.
Frequently Asked Questions
Q1: What is the difference between acetone and non-acetone nail polish removers?
Acetone nail polish removers contain the chemical acetone, which is a powerful solvent that quickly removes nail polish. Non-acetone nail polish removers, on the other hand, use gentler solvents like ethyl acetate or isopropyl alcohol. Acetone removers are generally more effective for removing stubborn or dark-colored polishes, while non-acetone removers are recommended for delicate or natural nails.
Q2: How should I prep my nails before using nail polish remover?
Before using nail polish remover, make sure to trim and file your nails to your desired shape. Next, wash your hands and nails thoroughly to remove any dirt or oils. You can also use a cuticle pusher to gently push back your cuticles for a clean polish application.
Q3: What is the most effective way to use nail polish remover?
To use nail polish remover effectively, soak a cotton ball or pad with the remover and press it onto your nail. Hold it in place for a few seconds to allow the remover to penetrate the polish. Then, gently swipe the cotton ball or pad across your nail in one direction to remove the polish. Avoid rubbing back and forth, as this can damage the nail.
Q4: How can I remove stubborn or glitter nail polishes?
Stubborn or glitter nail polishes can be more difficult to remove. One method is to soak a cotton ball or pad in the remover, place it on your nail, and wrap the nail with aluminum foil. Leave it on for 5-10 minutes to allow the remover to break down the polish before gently swiping it off. Alternatively, you can try using a nail polish remover specifically formulated for stubborn or glitter polishes.
Q5: What are some common mistakes to avoid when using nail polish remover?
One common mistake is using too much pressure when removing the polish, which can damage the nails. It is also important to avoid using nail polish remover on broken or irritated skin, as it can cause further irritation. Additionally, make sure to properly close the bottle of nail polish remover after use to prevent evaporation and maintain its effectiveness.
Q6: Are there any alternative methods for nail polish removal?
Yes, there are alternative methods for nail polish removal. Some people opt for nail polish remover pads, which come pre-soaked with remover, making them convenient for travel. Another option is using a peel-off base coat, which allows you to peel off the entire layer of polish without the need for remover. However, this method may not be as effective for stubborn or glitter polishes.
Q7: Can nail polish remover damage my nails?
Using nail polish remover properly should not damage your nails. However, if you frequently use acetone nail polish remover or apply excessive pressure when removing polish, it can cause dryness and weaken the nails. To minimize damage, consider using non-acetone removers, moisturizing your nails and cuticles regularly, and taking breaks between manicures.


