Basic Nail Art Tools Every Beginner Should Have
When it comes to nail art, having the right tools can make all the difference. As a beginner, it’s important to start with the basics before diving into more advanced techniques. In this blog post, we will discuss the essential nail art tools that every beginner should have in their collection.
List of Basic Nail Art Tools:
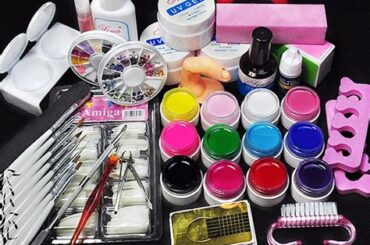
- Nail polish – a variety of colors and finishes
- Base coat – for protecting the nails
- Top coat – for sealing and adding shine
- Nail file – for shaping and smoothing the nails
- Buffer – for creating a smooth surface
- Cuticle pusher – for pushing back the cuticles
- Nail clippers – for trimming the nails
- Dotting tools – for creating various-sized dots
- Nail brushes – for detailed designs and clean-up
- Tweezers – for placing small embellishments
Table of Basic Nail Art Tools:
| Tool | Function |
|---|---|
| Nail polish | Provides color to the nails |
| Base coat | Protects the nails from staining |
| Top coat | Seals and adds shine to the design |
| Nail file | Shapes and smoothes the nails |
| Buffer | Creates a smooth surface |
| Cuticle pusher | Pushes back the cuticles for a neat look |
| Nail clippers | Trims the nails to desired length |
| Dotting tools | Allows for the creation of dots in different sizes |
| Nail brushes | Enables detailed designs and clean-up |
| Tweezers | Helps in placing small embellishments |
Having these basic nail art tools in your arsenal will provide you with endless possibilities for creating beautiful designs. Experiment with different techniques and unleash your creativity. Remember, practice makes perfect, so don’t get discouraged if your first attempts don’t turn out exactly as planned. With time and dedication, you’ll soon be able to create stunning nail art like a pro!
Step-by-Step Guide to Creating Marble Nail Art
There are many different types of nail art techniques, but one that has been gaining popularity recently is marble nail art. This unique and stunning design gives your nails a beautiful, marble-like appearance that is sure to turn heads. If you’re a beginner and want to try your hand at creating marble nail art, then you’re in luck! In this step-by-step guide, we will walk you through the process of creating your own marble nail art design.
To begin, you will need a few basic nail art tools. These tools include a base coat, a white nail polish, and a few different colors of nail polish. You will also need a small cup or bowl filled with room temperature water, and a toothpick or a thin brush.
The first step is to apply a base coat to your nails. This will help protect your nails and create a smooth surface for the nail polish. Once the base coat has dried, apply one or two coats of white nail polish to each nail. The white nail polish will act as the base color for your marble design.
Next, choose the colors you want to use for your marble design. You can use two or three different colors to create a more vibrant and colorful design. Open each bottle of nail polish and carefully place a few drops of each color onto the surface of the water in your cup or bowl. The drops should spread out and create a thin layer of polish on the water’s surface.
Once you have added the drops of nail polish to the water, use a toothpick or a thin brush to create swirls and patterns in the polish. Be creative and experiment with different patterns and techniques. Once you are happy with the design, simply press your nail onto the surface of the water and hold it there for a few seconds. Carefully remove your nail from the water and you will see the marble design transfer onto your nail. Repeat this process for each nail.
Finally, once the marble design has dried, apply a top coat to seal in the design and give your nails a glossy finish. This will also help protect your marble nail art and make it last longer. And there you have it! Your very own marble nail art design. With a little practice and creativity, you can create stunning marble designs that are sure to impress. So go ahead, give it a try and let your nails be a work of art!
Mastering the Skill of Watercolor Nail Art
Mastering the Skill of Watercolor Nail Art
Watercolor nail art is a beautiful and creative technique that allows you to achieve a soft and dreamy look on your nails. It can be a bit tricky to master, but with the right tools and practice, you can create stunning watercolor designs that will make your nails stand out. In this blog post, we will guide you through the step-by-step process of creating watercolor nail art and provide you with some essential tips and techniques to help you become a pro at this art form.
To create watercolor nail art, you will need a few basic tools. The most important tool is a set of watercolor nail polishes. These polishes are specifically designed to blend and create a watercolor effect on your nails. You will also need a thin brush for applying the polish and a small cup of water to dilute the colors. Additionally, having a top coat and base coat is essential to protect your design and make it last longer.
Once you have gathered all your tools, you can start creating your watercolor nail art. Begin by applying a base coat to protect your nails and allow it to dry completely. Next, choose the colors you want to use for your design. It is best to stick to a limited color palette to keep the design cohesive. Dip your thin brush into the water and then into the watercolor polish of your choice. Start by creating a light wash of color on your nails, using gentle strokes. Gradually build up the intensity of the color by adding more polish or more water to your brush. You can blend different colors together to create a beautiful gradient effect.
One important tip to remember when working with watercolor nail art is to let each layer of color dry completely before adding another layer. This will prevent the colors from smudging or bleeding into each other. Once you are satisfied with your design, let it dry completely and then apply a top coat to seal and protect your artwork. This will also give your nails a glossy finish.
In conclusion, mastering the skill of watercolor nail art requires practice and patience. With the right tools, techniques, and a little creativity, you can create beautiful and unique watercolor designs on your nails. Remember to experiment with different color combinations and have fun with the process. So, grab your watercolor nail polishes and start creating stunning watercolor nail art today!
| Tools | Techniques |
|---|---|
| Watercolor nail polishes | Creating a light wash of color |
| Thin brush | Blending colors together |
| Small cup of water | Building up the intensity of color |
| Top coat and base coat | Sealing and protecting the design |
Creating Stunning Ombre Nails like a Pro
Creating stunning ombre nails is a popular trend in the world of nail art. It involves blending two or more colors seamlessly to create a gradient effect on the nails. Ombre nails can be done in various color combinations, from bold and vibrant to soft and subtle. If you’re a beginner looking to try your hand at this technique, here are some basic nail art tools you should have:
1. Nail Polish: Choose two or more nail polish colors that complement each other well. You can opt for shades from the same color family or experiment with contrasting colors for a unique look.
2. Makeup Sponge: A makeup sponge is an essential tool for creating the ombre effect. Cut a small piece of the sponge and dab it lightly onto the nail to blend the colors together smoothly.
3. Clear Top Coat: A clear top coat is necessary to seal and protect your ombre design. It adds shine and longevity to your nail art, making it last longer.
Now that you have the necessary tools, here’s a step-by-step guide to creating stunning ombre nails like a pro:
Nail Stamping Techniques for Unique Designs
When it comes to creating unique and eye-catching nail designs, nail stamping techniques are a must-know for any nail art enthusiast. Nail stamping, also known as stamping nail art, is a fun and creative way to achieve intricate designs on your nails without the hassle of hand-painting. In this blog post, we will explore the basics of nail stamping and share some expert tips and tricks to help you master this technique and create stunning and unique nail designs.
Before diving into the nail stamping techniques, let’s first understand the basic nail art tools you will need to get started. Nail stamping requires a few essential tools:
- Nail Stamping Plate: This metal or plastic plate is engraved with various design patterns that can be transferred onto your nails.
- Stamper: A silicone or rubber stamping tool that picks up the design from the stamping plate and transfers it onto your nails.
- Scraper: A flat tool used to remove excess nail polish from the stamping plate.
- Nail Polish: Choose nail polishes that have a good consistency for stamping. Avoid polishes that are too watery or too thick.
Now that you have the basic tools ready, let’s move on to the step-by-step process of nail stamping to create unique designs.
Step 1: Prepare Your Nails
Clean and shape your nails as desired. Apply a base coat to protect your nails and allow it to dry completely before moving on to the next step.
Step 2: Choose Your Design
Select a design from the stamping plate that you would like to transfer onto your nails. Apply a generous amount of nail polish over the design, making sure to cover the entire pattern.
Step 3: Scrape off Excess Polish
Using the scraper, gently scrape off the excess nail polish from the stamping plate at a 45-degree angle. This will leave the polish only in the engraved design.
Step 4: Transfer Design onto the Stamper
Quickly press the stamper onto the design, picking up the pattern. Make sure to press firmly and evenly to transfer the design onto the stamper.
Step 5: Stamp Design onto Your Nails
Align the stamper with your nail and press it down gently to transfer the design onto your nail. You can gently roll or press the stamper to ensure an even transfer of the design. Repeat this step for each nail.
Once you have completed stamping all your nails, apply a top coat to seal in the design and add shine and longevity to your nail art.
Nail stamping techniques offer endless possibilities for creating unique and intricate nail designs. Experiment with different stamping plates, colors, and patterns to unleash your creativity and achieve stunning nail art like a pro. Whether you’re a beginner or an experienced nail artist, nail stamping is a technique that can elevate your nail game and help you achieve professional-looking designs with ease. So, grab your nail stamping tools and get ready to stamp your way to beautiful and unique nail art!
Frequently Asked Questions
What are the basic nail art tools every beginner should have?
Every beginner should have a set of nail brushes, dotting tools, a nail file, a buffing block, nail polish, and top coat.
What is the step-by-step guide to creating marble nail art?
To create marble nail art, start by applying a base coat, then choose two or more nail polish colors. Apply drops of each color onto your nails, then use a toothpick or a thin brush to create marble patterns. Finish with a top coat.
How can I master the skill of watercolor nail art?
To master watercolor nail art, start by applying a base coat, then choose two or more nail polish colors that blend well together. Apply drops of each color onto your nails, then use a fine brush dipped in water to create a watercolor effect. Finish with a top coat.
What are the steps to creating stunning ombre nails like a pro?
To create stunning ombre nails, start by applying a base coat, then choose two or more nail polish colors that blend well together. Apply the lightest color at the base of your nails, then apply a medium color in the middle and a darker color at the tips. Blend the colors with a sponge or a brush, then finish with a top coat.
What are nail stamping techniques for unique designs?
Nail stamping is a technique that allows you to transfer intricate designs onto your nails using a stamping plate, a stamper, and a scraper. Apply nail polish onto the desired design on the stamping plate, scrape off the excess, then press the stamper onto the design and transfer it onto your nails. Finish with a top coat.
What are some important tips for using nail stamping plates?
When using nail stamping plates, make sure to choose a design that fits your nail size. Apply nail polish evenly on the design and scrape off excess polish with a swift motion. Press the stamper onto the design at a 45-degree angle and transfer it onto your nails with a rolling motion. Clean the stamping plate between each use.
How can I make my nail art last longer?
To make your nail art last longer, apply a base coat before applying nail polish, and finish with a top coat to seal in the design. Avoid using your nails as tools and protect them from excessive water exposure. Additionally, touch up any chips or damage to maintain the overall appearance.


