Are you tired of the same old nail colors and designs? Looking for some creative and eye-catching nail art techniques to take your manicures to the next level? In this blog post, we will explore ten different nail art techniques that will help you unleash your creativity and achieve stunning designs. From stamping and stenciling to marbling and freehand painting, we’ll cover everything you need to know to create beautiful and unique nail art. Whether you’re a nail art enthusiast or just getting started, these techniques are perfect for adding a little extra flair to your manicures. So, if you’re ready to elevate your nail game, keep reading to discover the exciting world of nail art techniques.
Stamping: The Art of Design Transfer
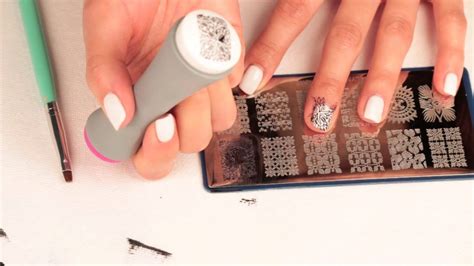
Stamping is a popular nail art technique that allows for intricate and detailed designs to be easily transferred onto your nails. It involves using stamping plates with various patterns and designs, along with special nail polish and a stamper to create stunning nail art. This method is perfect for those who want to add a touch of creativity to their manicures without spending hours on freehand painting.
One of the best things about stamping is that it is suitable for both beginners and experienced nail artists. With a little practice and the right tools, anyone can achieve professional-looking results. The key is to use the right technique and the appropriate pressure when transferring the design onto the nail.
There is a wide range of stamping plates available, featuring everything from floral patterns to geometric shapes, allowing for endless creativity and customization. The possibilities are truly endless, and you can create unique nail art that matches any occasion or outfit.
Overall, stamping is an excellent way to add intricate and detailed designs to your nails with ease. With the right tools and a bit of practice, you can create stunning nail art that is sure to turn heads.
Stenciling: Creating Intricate Patterns with Ease
Stenciling is a popular nail art technique that allows you to create intricate and beautiful patterns with ease. Whether you’re a beginner or an experienced nail artist, stenciling can add a touch of creativity and flair to your manicures.
One of the best things about stenciling is that it requires minimal effort and skill, but the results can be truly stunning. By using stencils with various designs, you can create professional-looking nail art without spending hours on intricate freehand painting.
Another great thing about stenciling is that it allows for endless creativity. You can mix and match different stencil designs, colors, and finishes to create unique and personalized nail art that reflects your style and personality.
So if you’re looking for an easy and effective way to add some flair to your manicures, give stenciling a try. With a bit of practice, you’ll be amazed at the beautiful patterns and designs you can create with this simple technique.
Marbling: Swirling Colors for Stunning Effects
Marbling is a fascinating nail art technique that allows you to create stunning, swirling patterns of color on your nails. Using marbling techniques, you can achieve a beautiful, one-of-a-kind look that is sure to turn heads.
One of the best things about marbling is that it’s easier than it looks. With just a few simple tools and some practice, you can master the art of swirling colors on your nails.
To get started with marbling, you’ll need a few basic supplies. First, you’ll need a base coat of nail polish. Once that’s dry, you can begin dropping different colors of nail polish into a small bowl of water. Use a toothpick to create swirling patterns in the polish, and then dip your nail into the water to transfer the design.
The result is a stunning, marble-like pattern that is sure to impress. With a little practice, you can create an endless variety of designs, each more beautiful than the last. So why not give marbling a try? You’ll be amazed at the stunning effects you can achieve with this simple nail art technique.
Water Decals: Instant Nail Art in Just a Few Steps
Water decals are a quick and easy way to achieve stunning nail art without spending hours in the salon. These decals are essentially thin, pre-printed designs that can be transferred onto the nails in just a few simple steps. Whether you’re a beginner or a seasoned nail art enthusiast, water decals can instantly elevate your manicure game.
First, start with a clean base coat on your nails. This will provide a smooth surface for the decals to adhere to and ensure a longer wear time. Once the base coat is dry, cut out the desired design from the sheet of water decals. Make sure to trim as close to the design as possible to avoid any excess material on the nails.
Next, place the cut-out decal in a small bowl of water for about 10-20 seconds. This will soften the decal and allow it to easily slide off the backing paper. Using a pair of tweezers, carefully remove the design from the water and place it onto your nail. Gently pat down any excess water with a paper towel or cotton swab, and finish with a layer of clear top coat to seal in the decal.
With just a few simple steps, you can achieve intricate and eye-catching nail art that looks like it took hours to create. Water decals come in a wide variety of designs and can be easily customized to suit any style or occasion. Whether you want floral patterns, geometric shapes, or even intricate artworks, water decals provide endless possibilities for stunning nail art.
Freehand Painting: Unleashing Your Creative Side
Freehand painting is a versatile and creative way to express yourself through nail art. With no need for stencils or stamps, this technique allows you to let your imagination run wild and create unique designs that reflect your personal style.
When you practice freehand painting, you have the freedom to experiment with different colors, shapes, and patterns, making each nail a canvas for your artistic expression. Whether you’re painting flowers, geometric designs, or intricate motifs, the possibilities are endless.
One of the most exciting aspects of freehand painting is the level of detail you can achieve. From delicate lines to tiny embellishments, this technique gives you the opportunity to add intricate elements to your nail art, showcasing your attention to detail and artistic skill.
By mastering the art of freehand painting, you can unlock endless possibilities for creative expression, allowing you to elevate your nail art to new heights and stand out with designs that are truly one-of-a-kind.
Negative Space: Modern Minimalism for Nail Art
When it comes to nail art, there are countless techniques and styles to choose from. One of the most popular trends in recent years is negative space nails, which allows for a modern and minimalist look. This technique involves strategically leaving blank spaces on the nails, creating a striking contrast between the natural nail and the design.
With negative space nail art, the possibilities are endless. You can create geometric shapes, intricate lines, or simple accents, all while showcasing the natural beauty of your nails. This style is perfect for those who prefer a more understated and elegant look, as it adds a touch of sophistication to any manicure.
One of the best things about negative space nail art is how versatile it is. You can mix and match different colors, patterns, and shapes to create a unique and personalized manicure. Whether you prefer bold and edgy designs or delicate and feminine looks, negative space nails can be tailored to fit your individual style.
Overall, negative space nail art is a trend that is here to stay. Its modern and minimalist aesthetic makes it a timeless choice for anyone looking to elevate their manicure game. So why not give this chic and sophisticated style a try for your next nail appointment?
Gradient Nails: Blending Colors for a Soft Look
Gradient nails have become a popular trend in the nail art world for their soft and blended appearance. This technique involves blending two or more nail polish colors together to create a seamless transition of color on the nails.
One of the easiest ways to achieve gradient nails is by using a makeup sponge. Start by painting the colors you want to blend onto the sponge in a line, slightly overlapping the colors. Then, gently press the sponge onto your nails and dab it back and forth to blend the colors together.
Another method for creating gradient nails is by using a nail brush. Apply the colors you want to blend in a line on a palette, then dip the brush into the colors and lightly feather it onto the nails in a back-and-forth motion to create a seamless gradient effect.
Once you’ve achieved the desired gradient effect, finish off your nails with a layer of top coat to seal in the colors and add a glossy finish. Gradient nails are a fun and versatile technique that allows for endless color combinations and designs.
Dotting: Adding Playful Polka Dots to Your Nails
Are you tired of the same old nail designs and want to add a playful touch to your nails? Dotting may be the perfect solution for you. With dotting tools, you can easily create fun and whimsical polka dot patterns that will make your nails stand out.
Using dotting tools of different sizes, you can create polka dots of varying sizes and patterns on your nails. Whether you want a subtle and delicate look or a bold and eye-catching design, dotting allows for endless possibilities.
In addition to traditional polka dots, you can get creative and use dotting tools to create other designs, such as flowers, hearts, or stars. The versatility of dotting tools makes them a must-have for anyone who loves to experiment with nail art.
So go ahead, grab a set of dotting tools, and add some playful polka dots to your nails for a fun and unique look that is sure to turn heads.
Ombre Nails: Mastering the Art of Color Gradation
Ombre nails have become a popular trend in the world of nail art. The technique involves blending colors together to create a seamless gradient effect on the nails. Mastering the art of color gradation can take your manicure to the next level and make a bold statement with your nails.
One of the key components of achieving the perfect ombre nails is choosing the right colors. You can experiment with different color combinations, from bold and vibrant hues to soft and subtle tones. The key is to select shades that blend well together and create a cohesive gradient effect.
Once you have chosen your colors, you can start creating your ombre nails using a makeup sponge. Simply apply the two (or more) chosen colors onto the sponge, and gently dab it onto your nails. This technique allows the colors to blend seamlessly, creating a smooth and beautiful gradient effect.
After applying the colors, finish off your ombre nails with a top coat to seal in the design and add a glossy finish. With a little practice and patience, you can master the art of color gradation and create stunning ombre nails that are sure to turn heads.
Tape Manicure: Simple Tricks for Geometric Designs
If you’re looking for an easy way to add some geometric flair to your nails, tape manicure is the perfect technique for you. With just a few simple tricks, you can create stunning designs that will make your nails stand out.
Start by applying a base coat to your nails and allowing it to dry completely. Then, choose the colors you want to use for your design. Once you have your colors picked out, cut small pieces of scotch tape and place them on your nails in the desired pattern. Make sure to press down firmly to create a clean edge.
Next, paint over the exposed areas of your nails with your chosen colors. Once the polish is dry, carefully peel off the tape to reveal the geometric design underneath. Finish with a top coat to seal in your design and protect your manicure.
Tape manicure is a simple and effective way to achieve professional-looking geometric designs on your nails. With a little patience and attention to detail, you can create a stunning manicure that is sure to turn heads.


