Discover essential nail art tools, DIY polish remover, creative designs, stamping tips, ombré nail tricks, easy tutorials, innovative techniques, secrets for long-lasting art, and inexpensive supplies.
Essential Nail Art Tools
Essential Nail Art Tools
Nail art is a fun and creative way to express yourself through your manicure. Whether you’re a beginner or a seasoned nail artist, having the right tools is essential to achieving professional-looking results. Here are some essential nail art tools that every nail lover should have in their collection.
Nail polish is the foundation of any nail art design, so it’s important to have a variety of colors and finishes to choose from. Invest in a good quality base coat and top coat to ensure your nail art lasts longer and looks flawless. A fine-tipped detailing brush is also a must-have for creating intricate designs and adding delicate details to your nails.
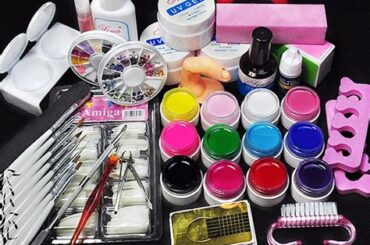
Other essential nail art tools include a dotting tool for creating perfect dots and circles, a set of nail art brushes for different painting techniques, and a set of nail art stencils for creating uniform patterns and designs. With these essential tools in your nail art kit, you’ll be ready to create stunning manicures and experiment with a variety of nail art techniques.
DIY Nail Polish Remover
DIY Nail Polish Remover
Are you tired of spending money on store-bought nail polish remover? Perhaps it’s time to try making your own DIY nail polish remover. Using household ingredients such as acetone or rubbing alcohol, you can create an effective and budget-friendly solution for removing your nail polish. Not only is this method more cost-effective, but it also reduces the amount of chemicals you expose your nails to, leading to healthier and stronger nails in the long run.
One popular method for creating DIY nail polish remover is to mix equal parts of acetone and white vinegar. This combination effectively breaks down the nail polish and makes it easier to remove. Alternatively, you can use rubbing alcohol instead of acetone for a gentler option. Simply soak a cotton ball or pad in the solution, place it on your nail, and let it sit for a few minutes before wiping off the polish. Additionally, adding a few drops of essential oils like lavender or tea tree oil can help nourish and strengthen your nails while removing the polish.
Another DIY nail polish remover option is to create a paste using lemon juice and white vinegar. The acidity of the lemon juice helps to dissolve the nail polish while the white vinegar acts as a natural disinfectant. This method is especially beneficial for individuals with sensitive skin or those looking for an eco-friendly alternative to traditional nail polish removers. By utilizing these simple and natural ingredients, you can say goodbye to harsh chemicals and hello to a more mindful nail care routine.
Creative Nail Design Ideas
Are you tired of the same old nail designs and looking for some fresh inspiration? Look no further! Get ready to take your nail game to the next level with these creative nail design ideas that will surely make heads turn.
One of the most popular trends in nail design right now is incorporating 3D elements into your nail art. From adorable charms to tiny gemstones, adding a touch of dimension to your nails can instantly elevate your look and add a fun and playful vibe. You can also experiment with different textures and finishes, like matte and glossy combinations or glittery accents to create a unique and eye-catching design.
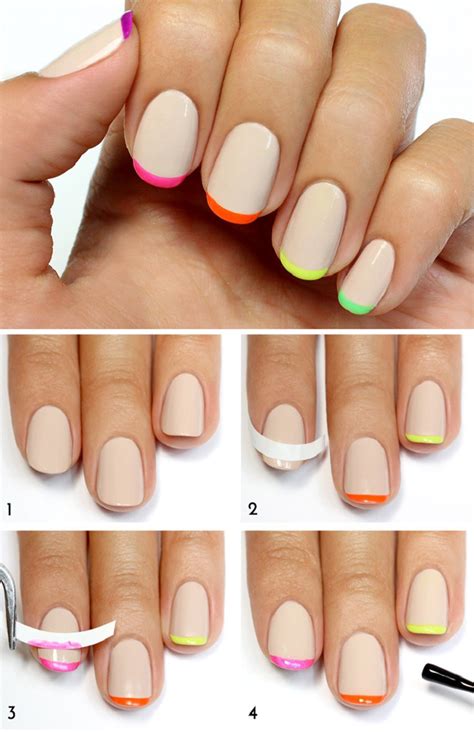
If you’re feeling adventurous, try experimenting with negative space nail designs. This involves leaving areas of your nails bare to create a cool and edgy look. You can use tape or nail stencils to create geometric patterns and shapes, or simply leave some parts of the nail unpainted for a minimalist yet striking effect.
Tips for Nail Stamping
Nail Art Hacks Every Nail Lover Should Know
When it comes to creating beautiful nail art, nail stamping can be a game-changer. This technique allows you to transfer intricate designs onto your nails with ease, making it the perfect choice for anyone who wants to achieve professional-looking nail art at home. However, nail stamping can be a bit tricky to master, so it’s important to keep a few tips in mind to ensure that your designs come out perfect every time.
First and foremost, it’s crucial to use the right type of nail polish for stamping. Look for polishes that are highly pigmented and have a thick consistency, as these will provide the best results. Additionally, make sure to work quickly when applying the polish to the stamping plate, as it can dry out fast and prevent the design from transferring onto your nails properly.
Another important tip for successful nail stamping is to use the right tools. Invest in a quality stamping kit that includes a scraper, stamping plates, and a stamper. These tools are specifically designed for nail stamping and will make the process much easier and more effective. Additionally, make sure to clean your stamping tools thoroughly after each use to prevent any dried polish from interfering with future designs.
Tricks for Ombré Nails
When it comes to achieving the perfect ombré nails, it’s all about blending and layering the colors seamlessly. Start by applying a base coat to protect your natural nails. Once it’s dry, choose two nail polish colors that complement each other and are in the same color family. Using a makeup sponge, apply a light layer of the lighter color to the sponge, and dab it onto the top half of your nail. Then, apply the darker color to the sponge and dab it onto the bottom half of your nail, overlapping it with the lighter color slightly. Repeat this process until you achieve the desired ombré effect.
After applying the colors, clean up any excess polish around the nails using a small brush dipped in nail polish remover. This will help define the ombré look and give your nails a professional finish. Finally, seal in the colors with a top coat to protect your manicure and give it a glossy finish.
Remember, practice makes perfect when it comes to ombré nails. Don’t be afraid to experiment with different color combinations and techniques to find the perfect ombré look for your nails. With a little patience and the right tools, you can master the art of ombré nails and create beautiful, gradient manicures at home.
Easy Nail Art Tutorials
Are you looking for simple and easy nail art tutorials to try at home? Look no further! We’ve got you covered with some fun and creative nail designs that are perfect for beginners. Nail art doesn’t have to be complicated or time-consuming, and with the right techniques, you can achieve stunning results.
One easy nail art tutorial that you can try is the classic polka dot design. All you need is two different nail polish colors and a dotting tool or toothpick. Start by applying a base coat and letting it dry, then use the dotting tool to create evenly spaced dots on each nail. You can mix and match different colors to create a playful and eye-catching look.
If you’re feeling adventurous, you can also experiment with geometric nail art. This can be as simple as using striping tape to create clean lines and shapes on your nails, or as complex as freehand painting intricate designs. The key is to start with a light base color and add contrasting geometric shapes using a thin nail art brush. This easy nail art tutorial will surely impress your friends and make your nails stand out.
Innovative Nail Art Techniques
When it comes to nail art, there are always new and innovative techniques to try. One of the most exciting innovations in the nail art world is the use of negative space designs. This technique involves leaving areas of the nail bare, creating unique and eye-catching patterns and shapes. By strategically painting certain areas of the nail while leaving others untouched, you can achieve a modern and sophisticated look that is sure to turn heads.
Another innovative nail art technique that has been gaining popularity is the use of chrome powder. This technique creates a stunning metallic finish that adds an instant touch of glam to any manicure. By carefully applying the chrome powder to the nails and sealing it with a top coat, you can achieve a mirror-like shine that is guaranteed to make a statement.
Finally, embellishments have become a popular way to take nail art to the next level. From rhinestones and studs to tiny beads and pearls, there are endless options for adding extra flair to your manicure. By incorporating these embellishments into your nail art designs, you can create unique and customized looks that are sure to stand out.
Secrets for Long-Lasting Nail Art
When it comes to nail art, one of the biggest challenges can be making your beautiful designs last. No one wants to spend hours creating the perfect manicure, only to have it chip or peel away within a few days. Thankfully, there are a few secrets to help make your nail art last longer.
First and foremost, it’s important to start with a clean slate. This means properly prepping your nails by removing any old polish and using a nail primer to create a smooth surface for your designs. Additionally, applying a base coat can help to protect your natural nails and provide a strong foundation for your nail art.
Another secret to long-lasting nail art is to seal in your designs with a top coat. This not only adds a beautiful shine to your manicure, but it also helps to protect your artwork from chipping and fading. Be sure to apply a fresh layer of top coat every few days to keep your nail art looking fresh and vibrant.
Inexpensive Nail Art Supplies
Are you a nail art enthusiast looking for affordable supplies to fuel your creativity? Look no further! We’ve compiled a list of budget-friendly nail art supplies that will help you achieve stunning designs without breaking the bank.
One essential inexpensive nail art supply is a good quality nail polish in various colors. You don’t need to splurge on high-end brands to create beautiful nail art. Look for affordable options with a wide range of colors to bring your nail designs to life.
Another cost-effective supply is a set of nail art brushes. You don’t need to invest in a pricey set to create intricate designs. There are plenty of affordable options available that will allow you to experiment with different brush sizes and shapes without spending a fortune.
Frequently Asked Questions
What are some nail art hacks for beginners?
For beginners, try using nail tape to create clean and precise lines or use a toothpick as a dotting tool for intricate designs.
How can I make my nail polish dry faster?
To make your nail polish dry faster, dip your nails in ice water for a few minutes after painting them.
What is the best way to remove glitter nail polish?
The best way to remove glitter nail polish is to soak a cotton ball in nail polish remover, place it on your nail, then wrap each finger in tin foil for a few minutes before wiping it off.
Can I create nail art designs using household items?
Yes, you can create nail art designs using household items such as bobby pins, makeup sponges, and even plastic wrap for unique textured looks.
How can I prevent my nail art from chipping?
To prevent your nail art from chipping, make sure to apply a top coat over your design and seal the edges of your nails with the polish.
What are some easy nail art designs for busy schedules?
For busy schedules, try a simple ombre effect using a makeup sponge or opt for a minimalistic geometric design using striping tape.
Is it possible to fix a smudged nail art design?
Yes, you can fix a smudged nail art design by using a nail art brush dipped in nail polish remover to carefully fix and clean up the smudged area.


