Discover the latest trends in Negative Space Nail Art, from choosing the right colors to creating clean geometric designs and adding finishing touches. Experiment with different patterns today!
Introduction to Negative Space Nail Art
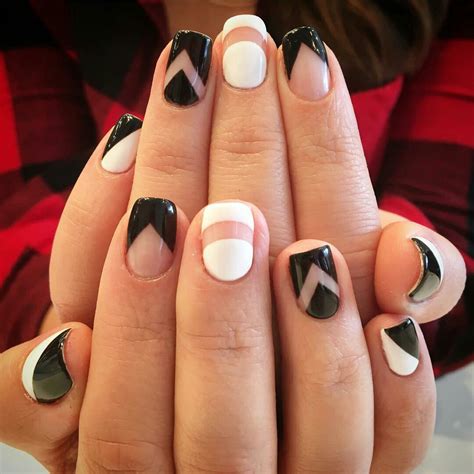
Negative space nail art is a trendy and stylish way to decorate your nails. It involves leaving parts of the nail bare, creating unique and eye-catching designs. This technique allows the natural nail to become an integral part of the design, rather than just a base for color. Negative space nail art is a great option for those who want to experiment with different patterns, shapes, and colors, while keeping a minimalist look.
When creating negative space nail art, it’s important to choose the right nail polish colors that complement the natural nail and the design you have in mind. By using subtle and understated colors, the negative space can stand out and become the focal point of the design. Additionally, using nail accessories such as studs, foils, or stickers can enhance the overall look of the negative space nail art.
Preparing your nails for negative space art is crucial for achieving a clean and professional finish. Trimming and shaping the nails, as well as using a base coat to protect the natural nail, are essential steps in the process. You can also experiment with different negative space patterns, such as geometric shapes or French tips, to add variety to your designs.
Choosing the Right Nail Polish Colors
Choosing the right nail polish colors can make a huge difference in your negative space nail art. When it comes to negative space designs, it’s important to choose nail polish colors that will create a bold and striking contrast against the bare nail. Look for bold, vibrant colors that will stand out against the negative space, such as deep reds, electric blues, and neon yellows. These colors will really pop against the natural color of your nails and create an eye-catching look.
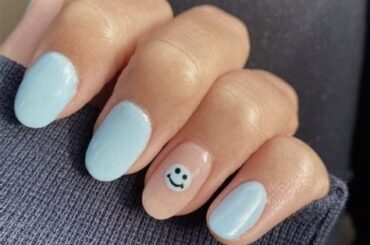
On the other hand, if you’re going for a more subtle and understated negative space design, consider using soft, pastel shades that will complement the natural look of your nails. Think pinks, light blues, and mint greens. These colors will create a more delicate and feminine look, perfect for a more minimalist negative space design.
Before you start your negative space nail art, it’s also important to consider the cohesion of your color scheme. Think about how the colors you’ve chosen will work together as a cohesive palette. Consider using colors that complement each other, such as a cool-toned blue with a warm-toned pink, or experiment with complementary colors for a more striking effect.
Preparing Your Nails for Negative Space
Before you begin creating your negative space nail art, it’s important to properly prepare your nails to ensure the best results. Start by removing any existing nail polish with a gentle acetone-free nail polish remover. This will help to clean the nails and create a fresh canvas for your negative space designs.
Next, trim and shape your nails to your preferred length and style. Use a nail file to smooth out any rough edges and create a clean, uniform shape. Properly shaped nails will provide a polished and professional look for your negative space nail art.
After shaping your nails, it’s essential to care for your cuticles. Gently push back your cuticles with a cuticle pusher or wooden stick to create a clean and tidy nail bed. You can also apply a cuticle oil or cream to keep your cuticles hydrated and healthy, which will contribute to the overall appearance of your negative space nail art.
Creating Geometric Negative Space Designs
When it comes to creating unique and eye-catching negative space nail art, geometric designs are a great choice. Geometric negative space designs can range from simple lines and shapes to more intricate patterns, allowing for endless creativity and versatility. By strategically incorporating negative space into your nail art, you can achieve a modern and minimalist look that is sure to stand out.
One key aspect of creating geometric negative space designs is using clean lines and shapes to define the negative space areas on your nails. This can be achieved through careful application of nail polish and the use of nail art tools such as striping tape or nail stencils. By paying attention to precision and symmetry, you can achieve a polished and professional-looking design that highlights the beauty of negative space.
Experimenting with different negative space patterns is another important element of creating geometric designs. You can play around with various shapes, angles, and color combinations to create visually interesting and dynamic nail art. Whether you opt for classic geometric patterns like stripes and chevrons, or more abstract designs inspired by modern art, the possibilities are endless when it comes to incorporating negative space into your nail art.
Using Negative Space for French Tips
French tips have long been a classic and timeless nail art design, but have you ever considered incorporating negative space into this traditional look? Negative space nail art is all about leaving areas of your nails bare, creating a modern and minimalist effect. When it comes to French tips, negative space can add a unique twist to this elegant style.
When using negative space for French tips, consider opting for a sheer or nude base color. This will allow the natural nail to show through, creating a subtle and understated look. You can then use a thin brush to carefully paint the white tips, leaving small gaps of the base color exposed. This will create the illusion of a classic French tip while incorporating the negative space element.
To take your negative space French tips to the next level, consider experimenting with different shapes and placements. Instead of the traditional white tips, try incorporating geometric shapes or lines for a modern twist. You can also play around with the placement of the negative space, opting for a diagonal or asymmetrical design for a more avant-garde look.
Incorporating Negative Space with Nail Accessories
Incorporating Negative Space with Nail Accessories
When it comes to creating negative space nail art, the options are endless. One of the most unique and creative ways to incorporate negative space into your nail designs is by using nail accessories. Whether it’s rhinestones, studs, or decals, these accessories can help to enhance the overall look of your negative space nails.
When using nail accessories with negative space designs, it’s important to consider the overall balance and composition of the design. You want to make sure that the accessories complement the negative space rather than overpowering it. Try using small accents strategically placed within the negative space to add an extra touch of flair to your nails.
Additionally, incorporating nail accessories into your negative space designs allows for endless creativity and customization. You can mix and match different accessories to create a unique look that reflects your personal style. From elegant and sophisticated to bold and edgy, the possibilities are truly endless when it comes to incorporating nail accessories into your negative space nail art.
Tips for Achieving Clean Lines and Shapes
Tips for Achieving Clean Lines and Shapes
When it comes to creating negative space nail art, achieving clean lines and shapes is crucial for a polished and professional finish. One of the most important tips for achieving clean lines and shapes is to use a high-quality nail polish in strong, bold colors. The pigmentation of the polish will make it easier to create precise lines and shapes without having to apply multiple coats.
Another tip is to use thin nail art brushes to carefully outline the negative space areas. These brushes allow for greater control and precision, resulting in neat and defined lines and shapes. Additionally, practicing on a nail wheel or practice sheet can help improve your technique and ensure that your lines and shapes are clean and uniform.
Lastly, applying a top coat with a thin brush around the negative space areas can help to further define the lines and shapes, as well as seal in the design for a long-lasting finish. By following these tips, you can master the art of achieving clean lines and shapes in your negative space nail art designs.
Experimenting with Different Negative Space Patterns
Experimenting with Different Negative Space Patterns
When it comes to negative space nail art, there are endless possibilities for creating unique and eye-catching designs. One of the most exciting aspects of negative space nail art is the ability to experiment with different patterns and shapes. By playing around with the placement of the negative space on your nails, you can create a wide variety of looks that are sure to impress.
Some popular negative space patterns include geometric shapes, asymmetrical designs, and abstract patterns. You can also experiment with combining negative space with other nail art techniques, such as ombre or glitter accents, to create even more dynamic looks. The key to successful experimentation is to have fun and be open to trying new ideas.
Whether you’re a seasoned nail art enthusiast or just starting out, don’t be afraid to push the boundaries and explore different negative space patterns. With a little creativity and a steady hand, you can create stunning nail art that is sure to turn heads.
Adding Finishing Touches to Your Negative Space Nail Art
Adding Finishing Touches to Your Negative Space Nail Art
Once you have created your negative space nail art design, it’s time to add the finishing touches to make it stand out. One way to enhance your negative space nail art is by incorporating glitter or metallic nail polish to add a touch of sparkle and shine. You can use a thin nail art brush to carefully apply the glitter or metallic polish to specific areas of your design, such as the outlines or geometric shapes, to create a stunning and eye-catching effect.
Another way to elevate your negative space nail art is by experimenting with different top coats. A high-gloss top coat can add a sleek and polished finish to your design, while a matte top coat can give your negative space nail art a more understated and modern look. You can also try a textured top coat to add depth and dimension to your design, creating a unique and tactile effect that will make your negative space nail art truly stand out.
Lastly, don’t forget to add a sealant to protect and preserve your negative space nail art. Once you have completed your design and added the finishing touches, apply a clear sealant over your nails to help prevent chipping and fading, ensuring that your negative space nail art will stay looking fresh and vibrant for days to come.
Frequently Asked Questions
What is negative space nail art?
Negative space nail art is a minimalist nail design where part of the natural nail is left bare or unpainted, creating a cool, modern look.
What are some popular negative space nail art designs?
Popular negative space nail art designs include geometric lines, cutouts, half-moons, and simple patterns that use the natural nail as part of the design.
What tools do I need to create negative space nail art?
To create negative space nail art, you will need a fine nail art brush, striping tape, nail polish, nail polish remover, and a base and top coat.
How do I create negative space nail art at home?
To create negative space nail art at home, start with clean, dry nails. Apply a base coat, then use striping tape to create the negative space design. Apply nail polish, remove the tape, and finish with a top coat.
Are there any tips for creating negative space nail art?
Some tips for creating negative space nail art include using a high-quality fine brush, practicing on a surface before painting nails, and being patient – precision is key.
How long does negative space nail art last?
The longevity of negative space nail art depends on factors such as nail polish quality and daily activities, but with proper care, it can last up to a week.
Can I add embellishments to negative space nail art?
Yes, you can add embellishments like rhinestones, studs, or decals to enhance your negative space nail art design, but be sure to secure them well with a clear top coat.


