Preparing your nails for application
When it comes to getting a flawless manicure, properly preparing your nails is essential. Preparing your nails for application sets the foundation for a long-lasting and beautiful manicure. It ensures that your nail tips adhere securely and allows for a seamless blending and shaping process. In this blog post, we will discuss the step-by-step process of preparing your nails for application.
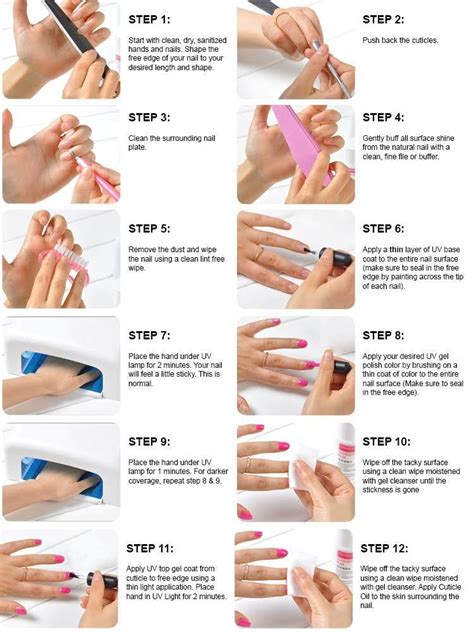
Firstly, start by removing any existing nail polish using an acetone-based nail polish remover. This will help to eliminate any residue or oils on your nails, allowing the nail tips to adhere better. Once the nail polish is removed, trim your nails to your desired length and shape using a nail clipper and file.
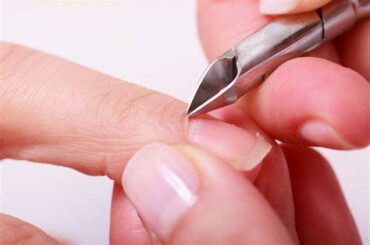
Next, gently push back your cuticles using a cuticle pusher or a wooden stick. This step is important as it creates a clean and smooth nail bed for the nail tips. Avoid cutting or trimming your cuticles, as this can increase the risk of infection.
After pushing back your cuticles, it’s time to buff the surface of your nails. Use a buffer block or a nail file with a buffing side to gently buff the top layer of your nails. This will help to remove any ridges or imperfections, creating a smooth surface for the nail tips to adhere to.
- Cleanse: Remove any existing nail polish and cleanse your nails using an acetone-based nail polish remover.
- Trim and shape: Trim your nails to your desired length and shape using a nail clipper and file.
- Push back cuticles: Gently push back your cuticles using a cuticle pusher or a wooden stick.
- Buff: Use a buffer block or a nail file with a buffing side to gently buff the surface of your nails.
| Step | Process |
|---|---|
| 1 | Remove any existing nail polish using an acetone-based nail polish remover. |
| 2 | Trim your nails to your desired length and shape using a nail clipper and file. |
| 3 | Gently push back your cuticles using a cuticle pusher or a wooden stick. |
| 4 | Use a buffer block or a nail file with a buffing side to gently buff the surface of your nails. |
Choosing the right nail tips for your nails
When it comes to achieving the perfect manicure, one of the most important factors to consider is choosing the right nail tips for your nails. Nail tips come in various shapes, lengths, and materials, and finding the right ones can make a significant difference in the overall appearance and durability of your nails.
Before diving into the vast selection of nail tips available, it’s essential to assess the natural shape and size of your nails. This will help determine the most suitable nail tip shape for your manicure. Common options include square, round, oval, stiletto, almond, and coffin shapes. To ensure a comfortable fit, select nail tips that closely match the width and curvature of your natural nails.
Once you’ve determined the right shape, it’s time to consider the length of the nail tips. If you prefer short nails, opt for tips that are just slightly longer than your natural nails. For those seeking a dramatic look or more room for nail art, longer tips may be more suitable. However, keep in mind that longer tips may require additional maintenance and care to prevent breakage.
- Consider the shape and size of your natural nails.
- Select nail tips that closely match the width and curvature of your natural nails.
- Choose the appropriate length of nail tips based on your desired look and lifestyle.
- Take into account the material of the nail tips.
- Consider the durability and flexibility of the nail tips.
Furthermore, the material of the nail tips is another crucial aspect to consider. Common options include plastic, acrylic, and gel. Plastic tips are relatively inexpensive and easy to apply, but they may not offer the same level of durability and flexibility as acrylic or gel tips. Acrylic tips can withstand more rigorous activities, while gel tips offer a more natural and lightweight feel.
| Material | Durability | Flexibility |
|---|---|---|
| Plastic | Moderate | Less flexible |
| Acrylic | High | Flexible |
| Gel | Moderate | Flexible |
Lastly, remember to consider your lifestyle and daily activities when choosing nail tips. If you lead an active lifestyle or frequently use your hands, you may prefer more durable and flexible tips. On the other hand, if you have a more refined or professional setting, you might prioritize a natural and understated look that gel tips can provide.
In conclusion, selecting the right nail tips is crucial for achieving a flawless and long-lasting manicure. By considering factors such as shape, size, length, material, and lifestyle, you can ensure that your chosen nail tips complement your natural nails and meet your desired aesthetic and functional needs.
Applying the nail tips accurately
When it comes to achieving the perfect manicure, one crucial step is applying the nail tips accurately. Nail tips, also known as artificial nails, are an excellent option for those who want to enhance the length and shape of their natural nails. Whether you have a special occasion coming up or simply want to switch up your look, applying nail tips can give you the desired length and style. In this blog post, we will guide you through the process of applying nail tips accurately for a flawless and professional-looking manicure.
Before you begin applying nail tips, it is essential to prepare your natural nails properly. Start by gently pushing back your cuticles and trimming your nails to your desired length. This step will ensure that the nail tips adhere seamlessly to your natural nails. Next, gently buff the surface of your nails to create a rough texture, which will help the nail glue adhere better. Finally, clean your nails with a gentle nail cleanser or rubbing alcohol to remove any oils or debris, ensuring a clean and smooth surface for the nail tips to adhere to.
Now that your natural nails are prepped and ready, it’s time to select the right nail tips for your desired look. Nail tips come in various shapes, sizes, and materials. For a more natural-looking manicure, choose nail tips that closely match the shape and width of your natural nails. If you prefer a more dramatic and elongated look, opt for longer and stiletto-shaped nail tips. Additionally, consider the material of the nail tips – acrylic and gel tips are the most common options. Each material has its own benefits, so select the one that suits your preferences and needs.
Once you have chosen the perfect nail tips, it’s time to apply them accurately to your natural nails. Begin by applying a small amount of nail glue onto the backside of the nail tip and gently press it onto your natural nail. Hold it in place for a few seconds to allow the glue to dry and secure the tip. Repeat this process for each nail, ensuring that the tips are centered and aligned with your natural nail beds. Once all the tips are in place, gently file the edges of the nail tips to blend them seamlessly with your natural nails. This step will create a smooth and natural-looking transition between the tips and your natural nails.
In order to ensure long-lasting wear, it is crucial to securely bond the nail tips to your natural nails. To do this, apply an additional layer of nail glue over the entire surface of each nail tip. This extra step will provide extra strength and durability to your manicure. Once the glue has dried, you can proceed with your regular nail polish application or any desired nail art designs. Remember to seal the edges of the nail tips with a top coat to prevent any lifting or chipping.
In conclusion, applying nail tips accurately is a vital step in achieving a flawless and professional-looking manicure. By properly preparing your natural nails and selecting the right nail tips, you can ensure a seamless and natural-looking result. With the right technique and a little bit of practice, you can confidently apply nail tips like a pro. So go ahead, experiment with different styles and lengths, and enjoy the versatility and beauty of nail tips!
Blending and shaping the nail tips seamlessly
When it comes to achieving the perfect set of nails, blending and shaping the nail tips seamlessly is a crucial step. Proper blending ensures that the nail tips seamlessly merge with your natural nails, creating a flawless and natural-looking manicure. Here are some tips on how to master the art of blending and shaping the nail tips:
- Choose the right nail tips: Before you can begin blending and shaping, it’s important to choose the right nail tips for your nails. There are various shapes and sizes available, so select ones that closely match the width and curvature of your natural nails. This will make the blending process much easier and ensure a seamless and secure fit.
- Prepare your nails: Before applying the nail tips, ensure that your natural nails are properly prepared. Clean your nails thoroughly and gently push back your cuticles. If needed, lightly file the surface of your nails to create a rough texture, which will help the nail tips adhere better.
- Blend the nail tips: To achieve a seamless blend, you need to carefully blend the nail tips with your natural nails. Start by applying a small amount of nail glue to the back of the tip, then place it onto your natural nail and press down firmly. Use a file to gently remove any excess tip material, working your way from the side towards the center. Take your time and be gentle to avoid damaging your nails.
- Shape the nails: Once the nail tips have been blended, it’s time to shape them to your desired length and style. Use a nail file to shape the tips, working in one direction to avoid splitting or weakening the nails. Whether you prefer a square, round, or almond shape, take your time to achieve the desired shape and smooth out any rough edges.
- Finishing touches: After shaping the nails, remove any dust or residue and wipe your nails clean. Apply a thin layer of clear base coat to strengthen and protect your nails. This will also ensure a smooth surface for the application of your chosen nail polish color or nail art design.
By following these steps, you can achieve a seamless blend and shape for your nail tips, resulting in a professional-looking manicure. Remember to be patient and take your time during the process, as precision is key. Whether you’re doing your nails at home or visiting a salon, mastering the art of blending and shaping will surely elevate your nail game.
Securing the nail tips for long-lasting wear
Securing the nail tips for long-lasting wear is an essential step in the nail application process. Once you have chosen the right nail tips and accurately applied them, it’s important to ensure that they stay in place for as long as possible. By following a few simple techniques, you can ensure that your nail tips are secure and can withstand daily activities without any issues.
One of the key factors in securing nail tips is using a reliable nail adhesive. There are various types of adhesives available in the market, such as nail glue and adhesive tabs. Nail glues are known for their strong bonding properties and are generally recommended for long-term wear. On the other hand, adhesive tabs provide a temporary hold and are ideal for short-term occasions or if you prefer to change your nail tips frequently. Whichever adhesive you choose, make sure to read the instructions carefully and apply it evenly onto the natural nail.
Another important step in securing nail tips is applying pressure. Once the adhesive is applied and the nail tip is in place, firmly press down on the tip to ensure a strong bond. This helps to eliminate any air bubbles or gaps between the natural nail and the tip, which can cause lifting or detachment. Applying pressure also helps to ensure that the nail tip is aligned properly and sits flush with the natural nail bed.
- Choose a reliable nail adhesive
- Apply the adhesive evenly onto the natural nail
- Firmly press down on the nail tip to eliminate air bubbles
- Ensure proper alignment and flush placement of the nail tip
- Avoid excessive contact with water in the first few hours
- Use a top coat to seal and protect the nail tips
In addition to using the right adhesive and applying pressure, it’s important to take certain precautions to ensure the longevity of your nail tips. Avoid excessive contact with water, especially in the first few hours after application, as moisture can weaken the adhesive. It’s also a good idea to use a top coat to seal and protect the nail tips, providing an extra layer of durability.
In conclusion, securing nail tips for long-lasting wear involves choosing the right adhesive, applying pressure during application, and taking necessary precautions. By following these steps, you can enjoy beautiful and secure nail tips that can withstand daily activities without any issues. With proper care and maintenance, your nail tips can last for weeks, allowing you to confidently flaunt your manicured nails.
Frequently Asked Questions
Question 1: How do I prepare my nails for application?
To prepare your nails for application, start by removing any old nail polish and filing your nails to the desired shape. Push back your cuticles gently using a cuticle pusher, and then buff the surface of each nail to create a smooth base for the nail tips.
Question 2: How do I choose the right nail tips for my nails?
When choosing nail tips, consider the size and shape of your natural nails. Select tips that closely match the width and shape of your nail beds to ensure a natural-looking result. You can also opt for custom-sized tips or choose from various pre-sized tips available in the market.
Question 3: What is the key to applying nail tips accurately?
The key to applying nail tips accurately is to ensure a strong bond between the tip and your natural nail. Apply a thin layer of nail glue on the back of the tip and press it firmly onto your natural nail, holding it in place for a few seconds. Make sure to align the tip properly to avoid any gaps or misplacement.
Question 4: How can I blend and shape the nail tips seamlessly?
To blend and shape the nail tips seamlessly, use a nail file to gently file down the tip’s edge, creating a smooth transition between the tip and your natural nail. This helps to create a more natural and flawless appearance. Shape the tips to match the desired nail shape, such as square, round, or oval.
Question 5: How do I secure the nail tips for long-lasting wear?
To secure the nail tips for long-lasting wear, it is essential to properly seal them with a high-quality nail glue. Apply a thin layer of glue along the edges of the tip and press it firmly onto your natural nail. Avoid applying too much glue to prevent excess from oozing out. Additionally, applying a layer of gel or acrylic overlay can provide extra strength and durability.
Question 6: Should I use a primer before applying nail tips?
Using a primer before applying nail tips is optional but recommended. A primer helps to create a better bond between the nail tip and your natural nail, resulting in improved adhesion and longevity. Apply a small amount of primer to your natural nail before gluing on the tips, following the manufacturer’s instructions.
Question 7: How should I care for my nails after applying tips?
After applying nail tips, it’s essential to maintain proper nail care to ensure the longevity of your manicure. Avoid excessively exposing your nails to water, harsh chemicals, or excessive force that can cause the tips to lift or break. Apply cuticle oil regularly to keep your cuticles and nail beds moisturized, and regularly touch up any chipped or worn-out areas to maintain a polished look.


