Are you tired of spending a fortune at the nail salon every time you want beautiful and trendy nail art? Look no further, because DIY nail art is the perfect solution for achieving gorgeous nails at home without breaking the bank. In this blog post, we will cover everything you need to know about DIY nail art, from gathering essential supplies to mastering various nail art techniques. Whether you’re a beginner or a seasoned nail art enthusiast, we’ve got you covered with step-by-step guides, easy designs, and creative ideas to elevate your nail game. Get ready to unleash your creativity and experiment with stunning gradient designs, French manicures, geometric patterns, nail stamping, floral designs, and more. Say goodbye to boring nails and hello to fabulous DIY nail art that’s perfect for any occasion. Let’s dive in and explore the world of DIY nail art together!
Introduction to DIY Nail Art
Are you tired of spending a significant amount of money at the nail salon every time you want a new manicure? If so, DIY nail art might be the perfect solution for you. With just a few essential supplies and a bit of practice, you can create beautiful and unique nail designs right in the comfort of your own home.
When it comes to DIY nail art, the possibilities are truly endless. From simple designs like polka dots and stripes to more intricate designs like ombre and floral patterns, there is something for everyone to try. Not only is DIY nail art a fun and creative way to express yourself, but it can also save you a lot of money in the long run.
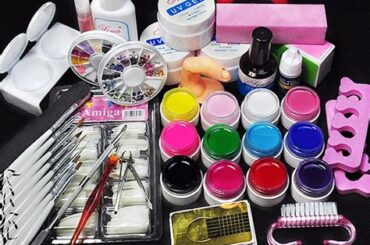
Before you get started, it’s important to gather all the essential supplies you’ll need. From nail polish and nail art brushes to nail stickers and rhinestones, having the right tools at your disposal is crucial to achieving professional-looking results. Fortunately, many of these supplies can be found at your local drugstore or beauty supply store.
Whether you’re a complete beginner or a seasoned nail art enthusiast, this blog post will guide you through the basics of DIY nail art, provide tips and tricks for creating stunning designs, and offer inspiration for different nail art ideas for various occasions. Get ready to unleash your creativity and elevate your nail game with the wonderful world of DIY nail art.
Gathering Essential Nail Art Supplies
When it comes to creating beautiful nail art, having the right supplies is essential. Whether you are a beginner or a seasoned nail artist, having a well-stocked nail art kit is crucial for creating stunning designs. From basic tools to specialized products, gathering the essential nail art supplies is the first step in unleashing your creativity.
Nail polish: One of the most basic supplies you will need for nail art is a variety of nail polish colors. From bold and bright shades to neutral and pastel tones, having a wide range of colors allows you to create endless designs.
Nail art brushes: Investing in a set of nail art brushes is essential for creating intricate designs. These fine-tipped brushes come in different sizes and shapes, allowing you to create precise lines, details, and patterns on your nails.
Nail art decorations: Adding decorative elements such as rhinestones, studs, and glitter to your nail designs can take them to the next level. Having a collection of nail art decorations allows you to add dimension and texture to your designs.
Top coat and base coat: Protecting your nail art with a quality top coat is important for longevity and shine. Additionally, a good base coat helps to prep the nails and ensure a smooth application of polish and designs.
Step-by-Step Guide to Basic Nail Art
Are you ready to explore the world of basic nail art? Creating fun and stylish nail designs can be a great way to express your creativity and add a personal touch to your look. The best part is, you don’t need to be a professional nail artist to achieve stunning results. With a few simple techniques and some essential supplies, you can easily master the art of basic nail art and elevate your manicure game.
First and foremost, gather all the essential nail art supplies you’ll need to get started. This includes a variety of nail polishes in different colors, a base coat, a top coat, nail art brushes, nail tape, and nail rhinestones or studs. Having the right tools at your disposal is key to achieving professional-looking nail designs.
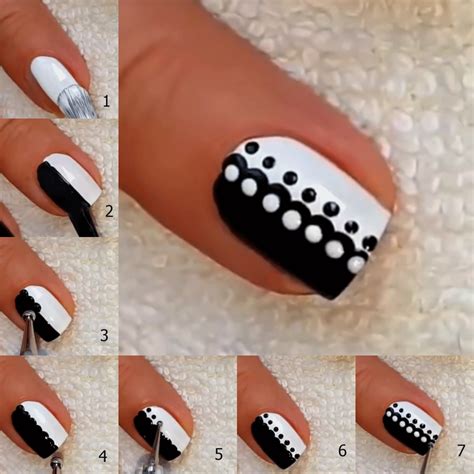
Once you have your supplies ready, it’s time to dive into the step-by-step process of creating basic nail art. Start by applying a base coat to protect your nails and create a smooth surface for the nail polish. Next, choose a base color and apply it to your nails. Once the base color is dry, use a nail art brush or nail tape to create simple designs such as stripes, dots, or geometric shapes. You can also experiment with different nail polish colors to create a colorful and playful look. Finish off your design with a top coat to seal in the colors and add shine to your nails.
With practice and patience, you’ll soon become a pro at basic nail art and be able to create beautiful designs that reflect your personal style. Whether you’re going for a subtle and chic look or a bold and vibrant design, the possibilities are endless when it comes to expressing yourself through nail art.
Creating Stunning Gradient Nail Designs
Are you looking to take your nail art to the next level? One way to create stunning and eye-catching nail designs is by mastering the art of gradient nails. This technique involves blending two or more colors seamlessly to create a beautiful transition of shades on your nails.
First, gather all the essential nail art supplies you will need for creating gradient nail designs, including a base coat, nail polish in your chosen colors, makeup sponges, and a top coat. The key to achieving a smooth gradient effect is to use colors that complement each other well.
Next, begin by applying a base coat to protect your natural nails and help the polish adhere better. Then, paint the lightest color as the base coat and allow it to dry completely. After that, apply the chosen colors onto the makeup sponge in a gradient pattern, making sure to overlap the colors slightly for a seamless blend.
Once you have the colors on the sponge, gently dab it onto your nails in a rolling motion, ensuring that the colors transfer evenly. You may need to repeat this step a few times to build up the intensity of the gradient. Finish off with a top coat to seal in the design and add shine to your gorgeous gradient nails.
Mastering the Art of French Manicure
French manicure is a classic and timeless nail art that exudes elegance and sophistication. Mastering this art can take your nail game to the next level. It involves creating a natural-looking base and adding a thin, white line at the tips of the nails. Achieving the perfect French manicure requires practice and precision.
Start by gathering all the essential supplies, including a base coat, sheer pink or nude nail polish, white nail polish, and a top coat. Ensure that your nails are clean and trimmed before you begin. Apply the base coat to protect your nails and create a smooth surface for the polish to adhere to.
Next, apply the sheer pink or nude nail polish to the entire nail, making sure to coat them evenly. Once the base color is dry, carefully paint a thin, white line at the tips of the nails. You can use nail guides or adhesive tape to create a straight line, or simply freehand it for a more natural look.
Finish off your French manicure with a top coat to seal in the design and add a glossy finish. With practice, you can perfect the technique and achieve a flawless French manicure that will leave your nails looking chic and polished.
Experimenting with Geometric Nail Art
When it comes to nail art, there are endless possibilities for creativity and self-expression. One popular trend that has been gaining momentum in the beauty world is geometric nail art. Geometric nail art involves using geometric shapes and patterns to create eye-catching and unique manicures. This style of nail art allows for endless customization, making it perfect for those who love to experiment with different designs and colors.
One of the best things about geometric nail art is that it can be as simple or complex as you desire. Whether you’re a beginner looking to dip your toes into the world of nail art, or a seasoned nail enthusiast, there are countless geometric designs that you can try. From stripes and triangles to chevron patterns and abstract designs, the options are truly limitless.
For those who are new to geometric nail art, starting with simple designs is a great way to ease into the trend. Try using striping tape to create clean lines and shapes, or experiment with negative space designs for a modern and minimalist look. As you become more comfortable with the technique, you can begin to incorporate more intricate patterns and color combinations into your designs.
Geometric nail art is a fun and stylish way to make a statement with your manicure. Whether you opt for bold, eye-catching designs or more subtle and understated patterns, experimenting with geometric nail art is a great way to showcase your personal style and creativity.
Nail Stamping: Elevating Your Nail Art Game
Nail stamping is an innovative and creative technique that can take your nail art to the next level. This method involves using stamping plates to transfer intricate designs onto your nails with precision and ease. Whether you’re a beginner or a seasoned nail artist, nail stamping offers a wide range of possibilities for elevating your nail art game.
One of the key benefits of nail stamping is the ability to create detailed and intricate designs that would be difficult to achieve with freehand painting. With the use of special stamping polish and stamping tools, you can effortlessly transfer intricate patterns, images, and even text onto your nails, allowing you to achieve professional-looking nail art in the comfort of your own home.
Additionally, nail stamping opens up a world of creative possibilities for experimenting with different colors, textures, and finishes. You can layer multiple stamping designs, mix and match patterns, and incorporate rhinestones, glitter, and other embellishments to create unique and eye-catching nail art that stands out from the crowd.
Whether you’re looking to add a touch of elegance with delicate floral designs or make a bold statement with geometric patterns, nail stamping is a versatile and exciting technique that allows you to unleash your creativity and elevate your nail art game.
Exploring Floral Nail Art Designs
Floral nail art designs are a beautiful and versatile way to express your creativity and add a touch of femininity to your manicure. Whether you prefer delicate daisies or bold roses, there are endless options for incorporating floral patterns into your nail art. From intricate hand-painted designs to the ease of floral nail stickers, there is a technique suitable for every skill level.
When exploring floral nail art designs, it’s important to gather the necessary supplies. You’ll need a variety of nail polish colors, a thin nail art brush for detailed designs, and perhaps some floral nail decals or stickers for added convenience. Don’t forget a top coat to seal in your design and make it last!
One of the most captivating aspects of floral nail art is the ability to experiment with different color combinations. From soft pastels to vibrant neons, there are endless ways to create stunning floral nail art. Consider incorporating negative space into your design for a modern twist, or layering different floral patterns for a unique and eye-catching look.
Whether you’re getting ready for a special occasion or simply want to elevate your everyday manicure, floral nail art designs offer a beautiful and elegant way to express your personal style and bring a touch of nature to your fingertips.
Incorporating Glitter and Rhinestones into your Nail Art
When it comes to elevating your nail art game, there are many techniques and materials you can use to create stunning designs. One popular way to add an extra touch of glamour to your nail art is by incorporating glitter and rhinestones. These sparkling additions can take your nails to the next level and make them stand out.
Glitter and rhinestones come in a variety of colors, shapes, and sizes, allowing you to get creative and experiment with different looks. Whether you want to add a subtle sparkle to your manicure or go all out with a glam design, there are endless possibilities when it comes to incorporating these eye-catching elements into your nail art.
One popular way to use glitter in nail art is by creating an ombre effect. You can apply the glitter polish starting from the base of your nails and gradually fading it towards the tips, creating a dazzling gradient effect. Alternatively, you can use a small brush to create a glitter accent on a specific area of your nails, such as the tips or the cuticle area, for a more subtle yet striking look.
As for rhinestones, you can use them to add dimension and texture to your nail art. Whether you want to create a simple yet elegant design with a single rhinestone accent, or go for a bolder look with clusters of rhinestones, the choice is yours. You can also experiment with different placement and patterns to create unique and personalized designs.
Nail Art Ideas for Different Occasions
When it comes to nail art, there are endless possibilities to express your creativity and style. Whether it’s a casual day out, a special event, or a holiday celebration, your nails can be the perfect accessory to complete your look. With the right nail art ideas for different occasions, you can always have the perfect manicure to match any outfit or theme.
For a casual day at the beach or a weekend brunch with friends, opt for a fun and colorful nail art design. Think pastel shades, delicate florals, or playful patterns to keep your nails looking fresh and vibrant. Adding a touch of glitter or a pop of metallic to your nails can also bring some extra fun to your casual look.
When attending a formal event such as a wedding or gala, a classic and elegant nail art design is a must. A French manicure with a twist, such as a subtle glitter accent or delicate nail stamping, can add a touch of sophistication to your nails. Neutral tones like nude, blush, or soft pink are timeless choices that will complement any formal attire.
For holiday occasions like Christmas, Halloween, or Valentine’s Day, get creative with themed nail art designs. Whether it’s festive patterns, seasonal colors, or holiday-inspired nail stickers, your nails can be your best accessory to get into the spirit of the occasion. Experiment with bold and vibrant colors, intricate nail stamping, or fun nail embellishments to make a statement with your manicure.


