Discover the basics of nail art, from tools and materials to easy designs like polka dots and stripes. Get inspired with floral, geometric, ombre, and marble designs. Perfect for beginners!
Introduction to Nail Art
Nail art has become a popular and creative way for individuals to express themselves through their personal style. It involves the use of various techniques and designs to decorate and enhance the appearance of the nails. Whether you’re a complete beginner or an experienced nail enthusiast, there’s always something new and exciting to learn in the world of nail art.
When starting out with nail art, it’s important to familiarize yourself with the basic tools and materials that are essential for creating stunning designs. From nail polish and nail art brushes to nail tape and rhinestones, having the right supplies on hand will make the process much easier and more enjoyable.
With the right guidance and practice, anyone can create beautiful nail art designs. In this blog post, we’ll explore seven fun and easy nail art designs that are perfect for beginners. From simple polka dot patterns to stunning ombre techniques, there’s something for everyone to try and enjoy!
Basic Tools and Materials
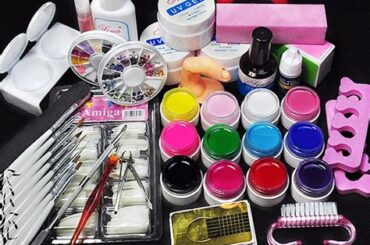
When it comes to creating beautiful nail art, having the right tools and materials is essential. There are a few basic items that every beginner nail artist should have in their kit. These include a set of nail art brushes in different sizes, a dotting tool for creating intricate designs, a fine-tipped nail art pen for precision work, and a set of nail art stickers and stencils for easy application.
In addition to tools, choosing the right materials is also important. High-quality nail polishes in a variety of colors are a must-have for any nail artist. It’s also important to have a good base coat and top coat to ensure your designs last and look professional. Nail art enthusiasts should also invest in some nail polish thinner to revive old polishes and make them easier to work with.
Of course, no nail art kit is complete without some extras to add a little flair to your designs. Glitter, rhinestones, and nail art tape are great additions to any collection and can take your nail art to the next level. With the right tools and materials, the only limit to your nail art designs is your imagination!
Simple Polka Dot Design
7 Fun and Easy Nail Art Designs for Beginners
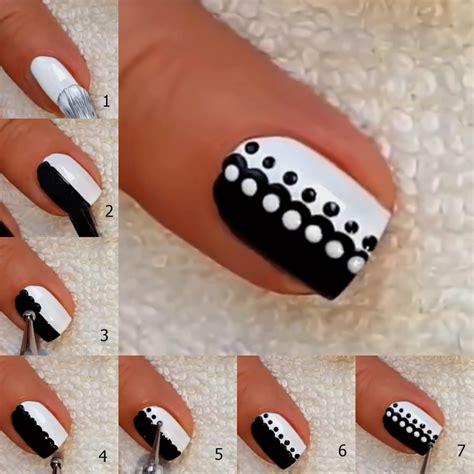
Creating a simple polka dot nail art design is a great way for beginners to start experimenting with nail art. To get started, you’ll need a few basic tools and materials, including nail polish in the color of your choice, a dotting tool or bobby pin, and a top coat for sealing in your design.
Once you have your materials ready, begin by applying a base coat to your nails to protect them and ensure your nail art lasts longer. Next, choose a contrasting color for your polka dots and apply it as a second coat. Once your base color is dry, use your dotting tool or bobby pin to create evenly spaced dots on each nail. You can vary the size of the dots for added interest.
After you’ve created your polka dot design, finish off with a layer of top coat to protect your design and give your nails a glossy finish. With a little practice, you’ll be able to create cute and stylish nail art designs like the simple polka dot design with ease.
Striped Nail Art Ideas
When it comes to nail art, creating striped designs can be a fun and easy way to add a pop of color to your nails. Whether you’re a beginner or a seasoned nail artist, there are endless possibilities when it comes to creating striped nail art. You can use different colors, widths, and patterns to create unique and eye-catching designs.
One simple and classic striped nail art idea is to alternate between two different colors on each nail. You can use tape or nail striping tape to create straight and clean lines, or you can freehand the stripes for a more organic look. Another fun idea is to create vertical stripes on one nail and horizontal stripes on another nail, for a playful and modern twist on the traditional striped design.
If you want to take your striped nail art to the next level, you can experiment with different textures and finishes. Try adding a layer of glitter polish over your striped design for a touch of sparkle, or use matte top coat to create a sleek and sophisticated look. You can also mix and match different patterns, such as floral or geometric shapes, with your striped design for a more intricate and unique nail art look.
Floral Nail Art Tutorial
Floral nail art designs are a popular choice for beginners because of their versatility and simplicity. To create a floral nail art design, you will need a few essential tools and materials such as a base coat, nail polish in various colors, a thin nail art brush, and a top coat. These basic tools will help you achieve a beautiful floral design on your nails.
The first step in creating a floral nail art design is to apply a base coat to your nails. This will help protect your nails and create a smooth surface for the nail polish. Once the base coat is dry, you can start creating your floral design using different colored nail polishes. You can use the thin nail art brush to create petals, leaves, and stems to form a floral pattern on your nails.
After you have completed your floral design, it is essential to seal it with a top coat to ensure that your nail art lasts longer. The top coat will also add shine and dimension to your floral nail art design. With a little practice and creativity, you can easily create beautiful floral nail art designs that will impress everyone around you.
Geometric Shapes Nail Designs
Geometric shapes nail designs are a popular choice for beginners because they are easy to create and have a modern look. You can create geometric nail designs using basic nail art tools and materials such as nail polish, nail tape, and nail art brushes. Start by applying a base coat of your chosen nail color and allow it to dry completely. Then, use nail tape to create straight lines, triangles, or squares on your nails. Fill in the shapes with different colors to create a geometric nail art look.
For a simple yet stylish geometric nail art design, try using triangular shapes in different colors. You can also create a bold geometric look by using bright and contrasting colors. Another option is to create a negative space geometric design by leaving some of your nails bare and painting geometric shapes on the rest. The possibilities are endless when it comes to geometric shapes nail designs, so feel free to experiment with different shapes, colors, and patterns.
Once you have mastered the basics of geometric nail art, you can also try more advanced techniques such as creating 3D geometric nail designs using nail accessories like studs and rhinestones. Geometric shapes nail designs are a great way to show off your creativity and make a statement with your nails. Whether you prefer simple and minimalistic designs or bold and eye-catching patterns, there is a geometric nail art look for everyone.
Ombre Nail Art Techniques
Creating an ombre nail art design is a fun and easy way to add some color and style to your nails. To get started, you will need a few basic tools and materials, including a base coat, two or more nail polish colors, a makeup sponge, and a top coat. Begin by applying a base coat to protect your nails and help the polish adhere better. Once the base coat is dry, choose your nail polish colors and pour a small amount of each color onto a piece of paper or foil.
Next, take your makeup sponge and dab a small amount of each color onto the sponge, making sure to slightly overlap the colors. With the colored side of the sponge facing down, gently press the sponge onto your nails in a tapping motion. Continue this process until you achieve the desired ombre effect on all of your nails. If necessary, you can repeat this step to build up the intensity of the colors.
Once you are satisfied with the ombre effect, allow the polish to dry completely before applying a top coat to seal in the design and add shine. You can also clean up any excess polish around your nails with a brush dipped in nail polish remover. With a little practice, you’ll be able to master the art of ombre nail designs and create beautiful, gradient looks on your nails.
Marble Nail Art for Beginners
Marble nail art is a trendy and fun design that beginners can easily achieve with a little practice. To create a marble nail art look, you will need a few essential tools and materials such as nail polish, a small plastic cup, water, and a nail art brush. Start by applying a base coat of your chosen nail polish color and allow it to dry completely before moving on to the next step.
Next, fill the plastic cup with room temperature water and drop a few drops of different colored nail polishes into the water, creating a bullseye pattern. Then, use the nail art brush to swirl the colors together in the water to create a marble effect. Once you are happy with the pattern, carefully dip your nail into the water, and the marble design will transfer onto your nail. Finish off with a top coat to seal in the design and give your nails a glossy finish.
Marble nail art is a versatile design that can be customized with different color combinations to suit any occasion or outfit. Whether you’re a beginner or an experienced nail artist, marble nail art is a timeless and elegant design that is sure to impress.
Tips for Nail Art Beginners
Starting out with nail art can be overwhelming, but with the right tips, beginners can make it a fun and enjoyable experience. One important tip for nail art beginners is to invest in basic tools and materials such as a dotting tool, nail tape, and nail polish in various colors. These tools will help you create a variety of designs and experiment with different techniques.
Another important tip for beginners is to start with simple designs such as polka dots, stripes, or floral patterns. These designs are easy to achieve and require minimal skill, making them perfect for those new to nail art. As you become more comfortable with these designs, you can then move on to more complex techniques such as ombre or marble nail art.
Finally, practice and patience are key when it comes to nail art. Don’t be discouraged if your first few attempts don’t turn out exactly as you had hoped. With time and dedication, your skills will improve, and you’ll be able to create beautiful nail art designs that you can be proud of.
Frequently Asked Questions
What are some easy nail art designs for beginners?
Some easy nail art designs for beginners include polka dots, stripes, ombre, floral, geometric, glitter, and marble designs.
How can I create polka dot nail art?
To create polka dot nail art, simply use a dotting tool or the end of a bobby pin to create evenly spaced dots on your nails using different colors.
What is ombre nail art and how can I achieve it?
Ombre nail art involves blending two or more colors to create a gradient effect. You can achieve this by using a makeup sponge to dab on the different colors onto your nails.
Can you explain how to create floral nail art?
Floral nail art can be achieved by using a thin nail art brush to paint flower petals and leaves with different colors. You can also use nail stickers or decals for an easier option.
How do I create a geometric nail art design?
Geometric nail art designs involve using tape or stencils to create straight lines, triangles, squares, or other shapes on your nails. Simply apply the tape or stencil to your nails and paint over it with your chosen color.
What is the easiest way to create glittery nails?
The easiest way to create glittery nails is by using a glitter nail polish or loose glitter. Simply apply the glitter polish or sprinkle the loose glitter onto your nails for a sparkly look.
Is it possible to create marble nail art at home?
Yes, you can create marble nail art at home by using a water marble technique. Simply drop nail polish onto the surface of water, swirl the colors together, and then dip your nails into the water to transfer the marble design.


